Monday, 7 January 2013

Project 59: Spice up your cards with some orange


I had the best playdate this weekend with Claire. She’s moving to NYC and this may have been our last ever playdate. So we seriously went to town and made cards for 12 hours straight, trying new techniques and new tools and new layouts and then finished off with some old favorites.

As a result we produced about 40 cards between us. And because of this I won’t be posting them all here in one post.

I’ve grouped them into posts that feel the most coherent and this one is probably the biggest stretch.

Orange is one of my favorite colours, I love using it as a bold accent in cards. And as a bold accent in life, generally.

The headline is one based on a pinterest sketch  that I found. I love gradient and you could obviously do this in any color as long as you can punch a butterfly (or any shape) and get a long enough scrap to make the gradient. 


This one is also based on a pinterest sketch  that I pinned a while ago. I just got a die cutting machine and with it I inherited this gift cutting die that cuts the package bows for you. So that was easier than ribbon.


Next is one of my standard layouts with layered patterned paper. I used a die cut flower topped with a button with a punched tag and stamped greeting. I added the embossed border below to add some technique and glittered random parts of the paper to make it playdate-worthy.


Finally this was a simple layout that I wanted to feature the Orla Kiely-style paper I found in Claire’s random scrap bag. A collection of candies at the bottom probably weren’t necessary but I freakin’ love candies.

I’ll post some of the other versions later this week, there are some real gems coming up J


Tuesday, 1 January 2013

Project 58: Fun with candies


Happy New Year! I wanted to mention that yes, I will be blogging again this year, but no, I will not be committing to do one post per week. I aim to still craft every week but I’m hoping to be a bit more lenient with myself as sometimes it was a stress-point to get a post done.

So straight in to today’s post – I have had a generous amount of craft bounty gifted to me for Christmas and as I had a few spare days before going back to work I gave myself time to really play with all the new kit.

I’ve themed this post candies as I realized about half way through my 2-day session that almost all of my cards featured them. Claire gave me a few new sets and a handy-dandy organizing set of really useful boxes so having them all sorted really inspired me to use them more. I see a candy-fuelled life ahead!

I started to write a short blurb about all of the cards but then I was getting bored so just the highlights (with new toys highlighted in brackets):

Headline card uses my Martha art deco scallop border punch on repeating papers. Takes ages. Never again. (Candies are new from Claire. All candies are in fact new for all cards.)


Simple divided layout using an embossed upper half, ribbon, patterned paper and stamped sentiment. (The green ribbon is from my stocking from my parents. My dad does a good job with ribbon choice. Also the green one uses a stamp that I have never found a use for before. Score.)

Next a gingham background using paper flowers, ribbon stripe in the middle, die cut and stamped sentiment.  (Some of the paper flower are new from Claire and features my new daisy-chain Martha punch from my parents.) 


A reverse-out flower punch with a very simple layout to keep the focus on the colourful flowers. (New punch from Joy.)


The only birthday card in the mix (I need thank yous for all the presents!) I made a hippie inspired card with a water-mark effect on stamps. (New tie-dye style stamps from my parents as well as the ribbon from my dad’s sale-bin-diving efforts.)


A butterfly layout where I fashioned an envelope by deconstructing a proper envelope. (no new toys other than the candies.) 


Another butterfly layout using a music stamp, butterfly punches and another stamp I have never been able to use before. (see above re: new toys.)

A card for my sister using the papers she gave me last year using an embossed thank you and simple layout. I tried to ink the thank you in light pink but it looked awful so I inked over it again in black. (as above) 


A stamped feature piece that I hand cut as I don’t have a die-cutter (yet!) using a complicated stamp and variegated gold paper. (as above) 


Finally this one is for Claire as this looks simple but was a major hassle. I put a strip of white paper down to highlight the red and white string and then managed to feed it through the double button and create the bow (15 minutes later…). The chipboard shapes were given to me by Claire last year in the $20 challenge and they were plain so I hand coloured the raised bits with a red felt tip pen. Then I stamped the sentiment. So it looks simple, but only a fellow crafter will see that it's more complicated to create. This one also does not use candies.Misleading for this post, I know.

I could have spread these out over two posts  but as I’m no longer tied to posting every week I’ll give you a bumper hit to make up for my 2 weeks of absence.

Hope you enjoyed the week of candy! 

Wednesday, 19 December 2012

Project 57: Christmas brownie bites


Every year the highlight of our social calendar is our own mini university-reunion Christmas party. A core group of  about 12 of us get together and eat and drink our collective body weight in Christmas fare.

It is excellent. It is our way of reliving our college years without the embarassment of outsiders seeing/judging us.

This year I was delegated the "sweet treats" task and as the party is on a Friday night (and thus requires mid-week prep) I needed something that would keep for a few days and travel well on the day.

I found this recipe in Good Housekeeping. Perfect for advance prep and traveling in a tin.  Brownies always keep well as they are so wonderfully sweet and mosit...at least when I make them from scratch and don't use a horrible pre-made mix they do!

Do mine look as good as their version? Not even close.

I could have carefully spread icing. I could have placed sprinkles more deliberately. I could have generally taken more care. But I think mine are awesome. Sweet treats are brought out no sooner than when everyone is about 3 bottles of wine (each) in and knowing my audience won't care about the precision, I abandoned the effort and let white chocolate clump together and sugar stick to every surface.

I aim to get back on here just before New Years as I anticipate getting a bit of kit over Christmas (ahem last minute shoppers looking for inspiration) and will want to try some new tricks. And if there is no posting before Christmas (it looks unlikely...) then I hope you have a great holiday!


Tuesday, 11 December 2012

Project 56: Christmas jam and candles


What a weekend of crafting has passed!

Firstly: spiced fig and plum jam. I love making jam and last year I trialled this one as a Christmas gift for a few family members. It proved a success so I’ve made it again. Largely for the same people. If you are reading this and you are on the Tracy side of the family: apologies. If you don’t want this please let me know and I will find it a good home!


My mother in law gave me this beautiful jam pan for my birthday one year and it has really been a fine friend.  

This year I did a little trick with my craft kit, using a punch to cut my wax discs to size. Clever me! 


And finally, after what felt like 3 days of watching it boil, all potted up. Even though the recipe is from GH, my companion in preserves is neatly on the side there, a handbook on preserving published through River Cottage.  If you’re even curious about preserving this is a great investment.

Next up: candle making.

I have a problem when it comes to hoarding. I’m not a tragic case yet but we have amassed a large collection of useless little things. One collection is little glass ramekins that come free with our favourite pre-made refrigerated desserts. Mmmm Gu puddings…

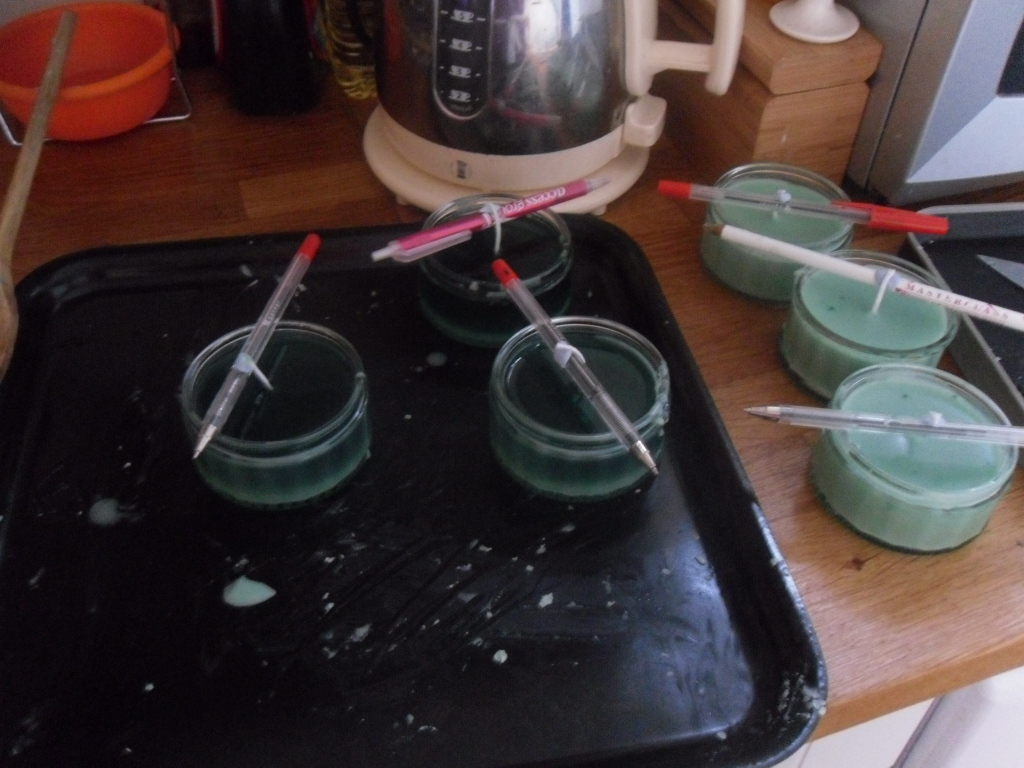
So with this collection I did some research and realised it would be very easy to turn them into candles. Quick bit of online purchasing and I had myself a beginners’ kit to make some container candles.


This process was a bit more involved but not overly labour intensive. You have to get the wick perfectly straight so you blue-tack it to a pencil lying across the top. (This is the tip in the instructions, not a fun fact from me. I used my clever innovative idea on the punch-cut-discs above.) 


Then you melt the wax in a double-boiler, adding dye and fragrance along the way. Pour it in and wait for it to set.

To dress them up as gifts (going into a gift set with the jam and these wreaths) I added some festive Christmas ribbon.


Wrapping things up: a bit of festive décor for the office. I decorated stockings for everyone in our office, bought some lights and little decorations and then wrangled the studio design team into carrying a tree home from town for me. Pure delight that I got all of this up with all the bah-humbugging in the office.

American friends – a note on spelling. I’m using my work computer and the spell-check is aggressive. I still think in American though.

Sunday, 2 December 2012

Project 55: Owl Chrristmas Cards


I know I haven't written in 2 weeks but I can assure you I have been crafting!

With Thanksgiving and a craft fair it has been manic. But happily we are back on track.

I wanted to do a post around my personal Christmas cards because now they have shipped I'm eager to share them with the world.

I bought the stamp in August at the craft fair I went to with Claire. I then waited about 3 months before trying any designs. I've been busy...don't judge me. All of the cards use a shimmery white card stock and a silver and white banner for the greeting.

Starting with the headline, this was the one I felt was most creative. I used three different blue inks on the stamp (yes, every single design was hand-stamped rather than scanned and printed) and then embellished it with buttons, glitter glue and gem stones.


The next one is the most traditional, using solid black ink and green and blue buttons and gems. I glittered the owl's wings and bellies as well to add some jazz. Claire likes these the most. They should be my faves too as they are the least fussy.


Finally these are the ones that I set out to create. Originally I wanted to do them all with tiny ProMarkers colored in. I did about 12 like this, all with a self-contained theme (70s yellow and red, all blue, girly purple and pink or as above, a mix of fairly neutral ones) and when they were taking me about 20 minutes to color a piece I had to get a grip and change plans. Which is how the other twctuo happened.

Hopefully you'll be receiving your card in the post shortly...

This weekend I will be posting a few more crafts, I have so many things to make as it's my only free weekend before the holiday. Candles, jam and maybe some candy and biscuits so watch this space and keep me honest!

PS Claire and I had a wicked time at the Berko craft fair this weekend. She took some pictures of our stand so I'll post them when they are available.

Friday, 16 November 2012

Christmas cards for sale!


Come one, come all, it's time to buy some Christmas cards!

The shop is now open, please form an orderly queue (or stampede your way through) to the Ham N Mule card shop.

All of the cards that I've posted previously are available to buy, plus Claire's lovely designs.

You can buy directly through the site using Pay Pal and major credit cards or you can get in touch with me directly and place an order.

Share this with your friends, family, colleagues...get involved! Visit the site here

Tuesday, 13 November 2012

Project 54: Mojo engagement card


Short post - and yes this is two in one day which is a record for me (obviously I need to  get out more).

I saw this week's Mojo sketch and had to play with it so I rushed home this evening to have a go. One of my best friends got engaged this weekend (in addition to my sister which means it was a hugely happy weekend!) and I thought immediately that this card layout would work well.

Here is the sketch I followed:


I tried lots of techniques to give it that special engagement-card luxury. I embossed the card in the middle with one of my favorite folders with leaves and birds and used my dotted scallop punch (<3 Martha Stewart) for the side. I went round the edge with an Almond colored Pro Marker, a practice of inking the sides in a slightly darker shade that I'm kind of obsessed with at the moment.

I used a scallop punch for the sparkly card and then added a paper flower with the button for the feature on the right. I wanted to add the sparkly paper for the bling factor but wanted to keep it rustic and chic so I used the button on the flower.

Turquoise, brown, cream and silver may seem random but the combo spoke to me. I love the background paper with the wheat pattern and I am hoping it'll speak to my friends' style.

The button coordinates with the brown ribbon, the grey flower coordinates with the silver greeting and cream is the non-sparkly version of my Hippie Chic stack of papers.  It came together like a dream.

Julesie - if you are reading this (likely my only non-relative fan!) - it's in the post from Saturday when I land in the US! Love you! xox