Tuesday 30 October 2012

Project 51: Halloween treats


Happy Halloween everyone! 

I’m dead tired (Halloween pun intended) after making all these treats. That’s right two weeknights in a row, two massive craft projects undertaken. 

So I’ll keep the posts short so I can go sit on the couch and watch Suburgatory.

First – the headline craft is my batch of marbled cookies. My dad sent me the recipe this weekend and I thought it would be perfect to sample. I’m really nervous with cut-out cookies because I’ve had so many bad experiences with sticky dough and the inability to roll it repeatedly. But this worked well!

I wish I could tell you where it came from but it was scanned in from a magazine or a newspaper I think. And anyway it was for Christmas cookies because most people don’t think of Halloween as a cookie-oriented holiday. It so is.

The icing  is just powdered sugar and water with food dye. Of course I didn’t make enough and so some of my bats are orange instead of black. Never mind. The marbling was easy. Just a stripe of the opposite color and then I dragged a toothpick through to make the stripy effect.

Second craft is what you would expect if you knew me: an owl-carved pumpkin. I bought a small pumpkin this year and kept the design super simple. I usually go for really complicated designs that don’t always work. Not this year. Sometimes you gotta go for the simple option.

I tried carving the circle on an angle and that gave it the halo effect behind the owl. Really like that!


And now for some Suburgatory. Happy Halloween! :) 

Sunday 28 October 2012

Project 50: New House Cards


Another week has flown by. I was hoping to write a post on the craft fair but a) I was extraordinarily busy this week with work shenanigans and b) I read Claire’s post and thought she’s done a much better job of it. If you click on the link you'll see me at our stand looking pretty good!

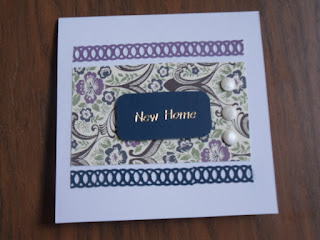
This week I needed to make a new home card and decided to do a batch while I was at it.
I struggle with house warming cards because I think they always have really twee houses and flowers and things. So I decided to go back to basics and try some of my original techniques and layouts and see where that got me.

Over the summer I bought these beautiful papers and with Christmas and wedding craft, I haven’t used them. I started with a dark blue base and embossed a wood grain pattern on it. LOVE. I was playing with the structural concept of a house, thus the wood grain…ok. This was originally where the thought came from but to be honest, it’s cool looking and for the sake of this blog, that’s what matters. 

I then layered this with a green knotted ribbon and a patterned paper to pull together the two colors. Finished with a sentiment on the unembossed scraps of blue paper, rounded corners, and presto we’re done.


Just to try a variation that was a bit less masculine (I thought the blue and green rocked but know cards are fundamentally more girly than boy-ish) I replaced the papers with a purple and floral number. Cute, but less striking than the original.


And then to make use of my random scraps that were lying around I tried a new lattice punch that Claire got me from the US (told her that Marshall’s is full of craft bounty if you have a keen eye) and layered that above and below the flowery paper. Candies down the side to finish it off. I have to practice with the punch a bit more I think. 

I think the first is the best one but not too bad for a frenzied hour of crafting!

Tuesday 16 October 2012

Project 49: Halloween cards


This week has been just crazy. And it’s Tuesday.

First challenge of the week was when Claire and I decided that the black-based Snow People cards needed to come with a gel pen as a free gift. It’s a nice touch and it makes lives easier as you can’t just write on a black card with a black pen. It would have been more helpful if we had come to this generous conclusion a month ago so we could have sourced cheap pens. But never mind, Wilkinsons to the rescue.

Next I was on serious bagging duty for the dozens of cards I made this weekend. About 70. Boo. 70 plastic bags to open, stuff and seal. Boo.

So with all this Boo-ing I managed to fit in 13 butterfly cards (so I don’t just have Christmas cards at the fair this weekend) and thought some Halloween cards were due.

Claire bought me this sweet pumpkin punch and I thought the best way to feature it was on (yet another) black card base.

I layered the orange punch outline with a black and white spotted ribbon, and hand-wrote the “boo!” greeting (largely because I’m too cheap to buy a one-use stamp) on a plain white circle. I added the black candies as they are a bit ghostly on the black card and I thought they dressed it up a bit.

If these bad-boys don’t sell then look for one in your mailbox because they are not going to waste.

If I don’t post again before Saturday then wish me luck – first craft fair in Rye this weekend!

Thursday 11 October 2012

Project 48: Monochrome Christmas card


Short post! I thought I’d share my favourite Christmas card in the mix so far: there’s no people like show people.

I fell in love with this stamp, I found it for 50p in my local craft store in August. Love being the early worm when it comes to Christmas!

I saw a Pinterest post (which I can't find now) that used a dotted embossing folder for snow (cue “duh!” moment) so I embossed some photo paper to give it that freshly-fallen-snow glisten.

Bit of white ribbon, corner punched with Claire’s Martha snowflake punch and put on a black bevel-edged card and we’re laughing. I raised the greeting with some thick foam pads to give it lift though not as much as the shadow in the picture would have you believe.

It’s rare that I look at a card and go: I made that and that’s amazing so I must be amazing. But I’m feeling that right now.

Happy monochrome Christmas.


Sunday 7 October 2012

Project 47: More Christmas cards for the fair


This week has been crazy! Almost every night has had a bit of Christmas craft. We’re selling at a craft fair in 2 weeks so it’s time to get everything prepped as much as possible.

I have 4 designs completely finished with about 20 cards of each. I’m hoping to bring 2 more designs and 30 for each one by the time of the fair…we’ll see what’s possible!

Here are three of the designs I haven’t posted before (the fourth is the 4 square box card posted previously):

First is a tree card, made of two big green triangles and decorated with some mosaic mirror tiles. I’ve done a few iterations of the card but this is my favourite.


The next is a different version of the wreath cards I posted previously. This is a slight twist, using small glitter dots instead of bling and no bows – I didn’t think they worked and Claire agreed. I chose country-style papers like gingham and tartan so the buttons fit in well.

Finally the headline card is a wreath made of corrugated green card, fixed with buttons, bling and glitter dots. I ran ribbon down the side- I chose ugly Christmas sweater-style ribbons. I love them.


Two more designs featuring snowflakes to come…

Claire has been doing some beautiful stamped cards with penguins and reindeer so I’ll post a link to her blog when she posts them.

If she’s reading this now…post them!