Showing posts with label Bless the USA. Show all posts

Thursday, 15 December 2016

Project 384: More sets for Christmas


Set post number 2! I have been working hard on these the last few days. Yesterday I showcased 2 sets, today you get two more. These were much more personal to the recipients, not that the others weren't, I just spent a bit more time making choices on these.


The headline card and the ones featured here were great to make. The cards are from a Creative Stamping magazine freebie set that I either die cut or fussy cut and then colored using Spectrum Noir pencils. Rarely use pencils these days, it was great fun to get them out. I added glitter accents to make it pop out and then little touches of bling or mini pearls. Really simple but I think the recipient will like them.


And now these are just as random as you like. The colleague in question is moving from London to NY next year hence some of the featured stamps. The others are really just random things that made me think of her! I went fishing through my big wooden blocks and these are the ones that all seemed the best, I love going through those because they're not organised like my clear stamps, it's just a grab bag of fun. I painted the background with watercolored distress inks, really simple.


Sunday, 15 November 2015

Project 275: A western layout double challenge


This week Claire showed me 'Shopping Our Stash' blog and I was inspired by this week's Western Theme challenge. Just this week Claire gave me a bumper haul of Unity stamps and it included a gorgeous cowgirl stamp.

I was desperate to use her for something special and I thought I'd get ahead (ok - really ahead) and make a birthday card for my husband as he often calls me Jessie the Cowgirl after the Toy Story 2 (and 3) character. 

I also liked the layout at Sketch Saturday and knew that she was a good shape to feature in that central panel. 

I made it a portrait orientation instead of landscape to better use the image. I colored her with ProMarkers and added the sentiment from Stampin' Up Endless Birthday Wishes. The papers are both scraps that I had kicking around my stash, I thought the orange and red felt Western, particularly the plaid. The sparkly stars complete the sketch and these are from a 4th July care package a girlfriend sent me years ago - I love them and they just work so perfectly for the theme.

I loved using this stamp and am so glad I found a new challenge to play along with this week.

Tuesday, 17 February 2015

Project 204: Another Minion card


I was asked to make a special commission for my colleague involving minions – yes, again! See this post for the original. 

This time around she asked if there was a way to have multiple minions, not just one big one. She also asked if I could incorporate her boyfriend’s name and the fact he was 28. A pretty precise brief but I’m always game for that.

This was a fun but super time consuming project! I cut almost everything by hand. The yellow blocks were cut by hand. I tried to use a corner rounder to round the heads but it was too blocky so I ended up doing each corner individually. 

The blue overalls are just squares and I cut little yellow triangles for the arms. The triangles were the worst. 

The white eyes are the punch-outs from a standard hole punch - nothing fancy. All the black details are drawn on: glasses, little icon on the overalls, hair - was just easier to do it directly than try to cut anything else! 

Finally I made the little tags and used a cut toothpick for the flag post. I don't know if it's obvious now with the greeting but the minions are arranged in a 28...might be too subtle but I think it's great and it's my creation. Let's hope she likes it as much as me :) 


Wednesday, 7 January 2015

Project 198: A Red White and Blue 30th


Next week is my husband's 30th birthday and I have a tradition of using KennyK stamps so I wanted to keep that up with a special twist for this monumental birthday and enter in KennyK challenge 186 with a twist of new beginnings. Entering your 30s is a new beginning if you ask me!

I decided to go for the Fourth of July digi from KennyK as I'm American (he's English) and thought I'd go full red white and blue for the whole card. It was also partially inspired by the beautiful stencilled background from my friend Claire who gave that to me as sample of her work for me to repurpose. Isn't it great!? It uses Chelsea blue and as that's my husband's favourite colour (and football team) I thought it was perfect to use as a background.

The image is coloured with ProMarkers and then blinded up with Stickles glitter glue (red on the hat and bikini bottoms, clear on the bikini top). There are big blue stars on her hat and a big red star in the corner.

Finally I topped it with a big blingy 30 in the middle and left the sentiment off. He knows it is his birthday after all!


Monday, 8 December 2014

Project 194: An alternative travel Christmas card


I had a bit of a splurge at Michael's on Black Friday this year and this amazing Tim Holtz travel stamp pack ended up in my trolley. I did a bit of a road trip with my husband and inlaws this year out West, going (briefly) on Route 66 while we were travelling through Arizona. My inlaws love nostalgic Americana and so I decided to make them an alternative Christmas card to remember our trip.

It just happens to fit in perfectly with I Love ProMarkers' challenge this week as well!

I stamped the image and added small touches of color using Berry Red and Lush Green ProMarkers. I then punched the border in metallic green paper using a Martha Stewart scallop punch.

There are some glitter glue details on the car and then a shiny gold candi in the corner. I added a Jolee's santa hat sticker to give it an extra little wink.

Simple layout and greeting free- I wanted the stamp to do all the talking here!

Sunday, 8 September 2013

Project 99: NOLA Mojo birthday card


Today was the first Skype playdate with Claire and what a success. We got to gossip, craft and critique each other's work just like the old times. Unlike the old times we couldn't steal each other's stash! Boo that!


We looked at different blogs and came up with a couple of different challenges for ourselves. The headline card is my Mojo Monday entry, just in time before the deadline! Above is the sketch that we followed. If you go to Claire's blog you can see her challenge entry as well. Love her worldly card and of course I love the recipient!

My family love New Orleans and we spent Thanksgiving there last year. As a reminder, I thought I'd make my dad this NOLA inspired birthday card. I have fleur de lis dies and embossing folders, which makes the job easier, and focusd on the three main Mardi Gras colors of purple, gold and green.

I textured the green paper with a music stamp to tie into the culture and blinged up one of the embossed fleur de lis from the embossed card. I recreated the points of the fleur de lis using petal shaped purple bling. I love it and I think my dad is going to love it as well.

Saturday, 4 May 2013

Project 79: Cinco de Mayo festivities


Hello friends and happy Cinco de Mayo!

I know I have been a bit absent but I am hoping the craft extravaganza I am about to show will make up for it. 

I am throwing a Cinco de Mayo party tomorrow, less because of any Mexican heritage and more because I wanted to throw a party over the bank holiday for a few friends and this Sunday happened to be Cinco de Mayo. So sombreros all around!

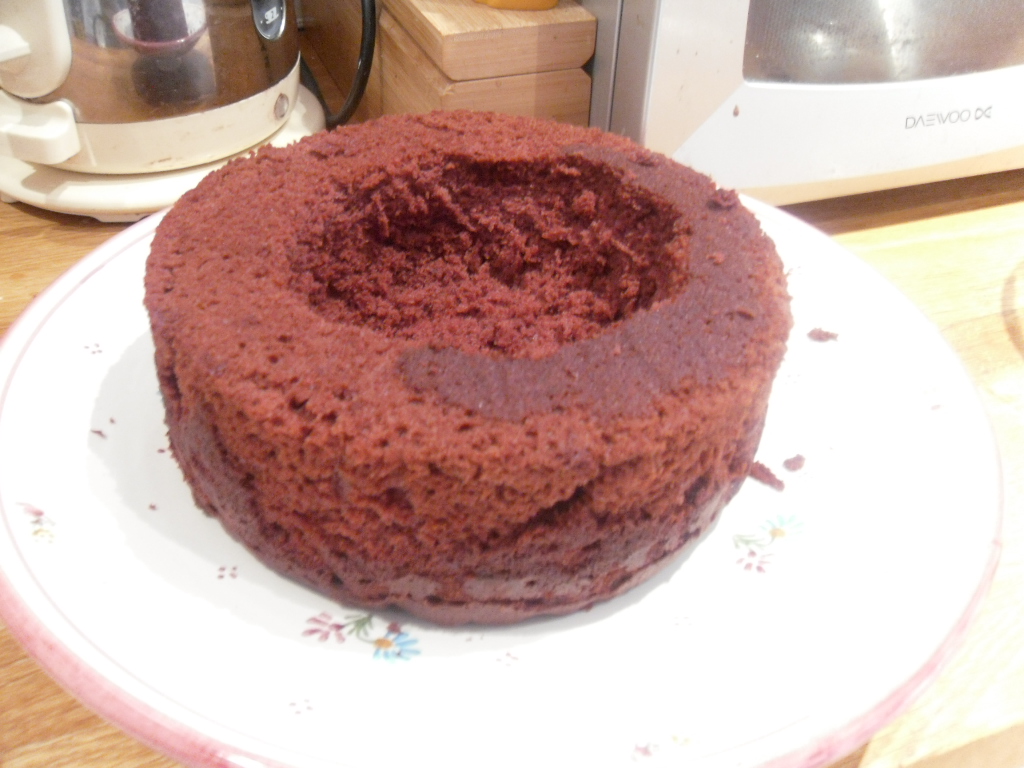
I wasn’t allowed to make a piñata as O thought it would be dangerous for us/our things/our friends to hit things with a stick after a few drinks. That makes sense so I decided instead to make a piñata cake, which is the headline picture following this blog’s recommendation.


After making one very deep layer and one shallow layer I hollowed out the deep layer and filled it with sweets. The blog says to hollow out the top but I made the bottom layer deep enough I didn't have to. I iced it and made a piñata template and carefully placed the sugar to get the layered effect. I will take pictures tomorrow when we cut into it to show the sweets pouring out.

Next up is a Mexican spin on bunting, taken from Martha. I love Martha. Also in the little series that I’ve linked to she has a recipe for some alcohol-soaked fruit and good snacks that I’m in the process of prepping as well.


These were pretty easy – I got a big bundle of colored tissue from the 99p store and then cut squares, then cut up the fringe. I taped them together and then folded over the top to have a string tucked underneath so I could hang it across the room.


Here I’ve made a “Pin the tail on the piñata” board using the same tissue paper fringe technique. I pieced it all out and then cut out the shape to mount on the board. I’m rather fond of my one-eyed burro.

Finally I printed out a few of these Cinco de Mayo posters from 1901 to put on the walls and doors throughout my flat.

I’ll take pictures tomorrow once I’ve put out the colorful tablecloths, napkins, plates, party poppers and confetti. It’s going to be ace.

Next blog post will be post-tequila shots… :) 


Thursday, 2 February 2012

Project 6: Groundhog Day treats

It’s Groundhog Day in the US and I love the idea of celebrating this. It’s our managing director’s birthday today and he’s technically American, having been born there but immediately leaving to be raised in Britain with a Home Counties accent, so I decided to celebrate this. Our MD has some serious baking abilities that we constantly tease him about. He will stay up half the night with his wife making the most incredibly complex cakes (he made an interactive carousel cake that had horses and glitter and lights and it was a thing of wonder in the end) and I thought – hey now, let’s make something crazy and celebrate Groundhog Day at the same time!

So I found these groundhog cupcakes and couldn’t be asked to make the cupcakes so I just made the groundhogs. He’ll never know that there were supposed to be cakes.

This is what a groundhog made of a Mars bar, chocolate button ears and cheeks and marshmallow eyes and nose looks like:

I think it’s awesome.

An army of them looks like this:

But if you want to be really impressed and see the original, look no further than here.

The person who created these not only put them on sticks to go into cupcakes but also put them on push-pops so that the groundhog can come out of his hole to look at his shadow. And she puts crumbs on some for a shadow. Really? I mean I’m impressed but sort of intimidated at the level of detail. Good on you Sweetology.