Showing posts with label Critters. Show all posts

Thursday, 17 January 2019

Project: A heart challenge for Moving Along with the Times


Hello and welcome to another fun challenge at Moving Along with the Times! We have a heart theme this week so it should be fun to play along with. 

I decided to modify one of my favourite Bugaboo images. Normally the mouse is chasing a balloon but I used a stitched heart die instead. Look at his little face! Such joy! 

I used ProMarkers to colour him in and then die cut him out into the circle so he could pop out a bit against the background. I used a giant background stamp to get the irregular dots using a splash of water over distress ink to make them a bit whispery. 

The sentiment is an ancient one and I kind of wish I had made it pop out more but never mind! 

Hope you have fun playing along this week! 

Saturday, 1 September 2018

Project: Monster unicorns for Sketch Saturday


Hello everyone and happy Saturday, another chance to play with Sketch Saturday. I LOVE our sponsor, Oddball Art Co, every time I go on their site I fall a bit more in love with their collection of quirky but sweet images. 

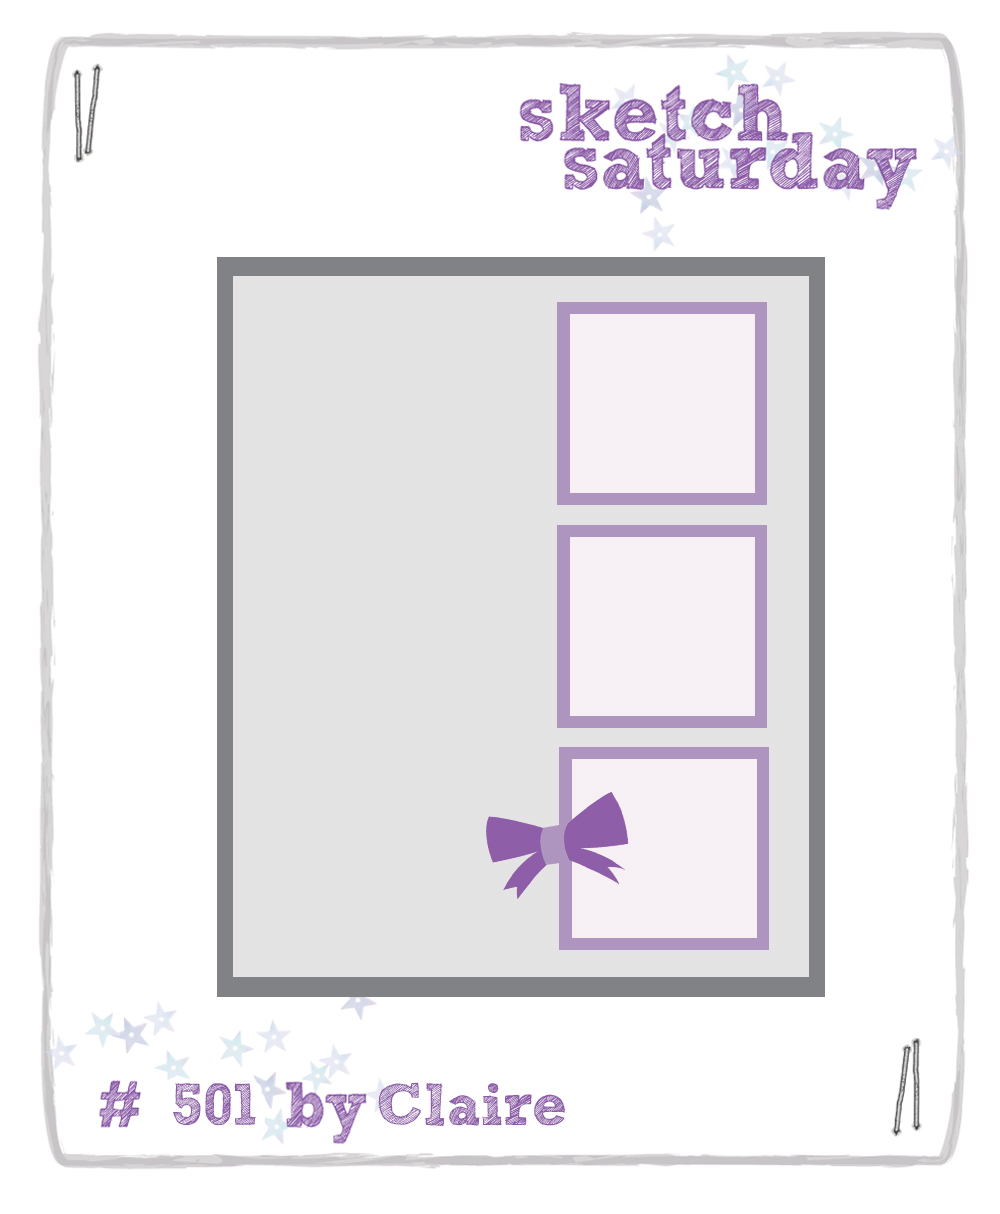
I mean, look at these weird little unicorn monster guys and tell me they aren't just amazing. Impossible. And they went so well with this week's sketch: 


I rotated the sketch on its side so I could have the border not he bottom. I colored the image using ProMarkers and then die cut it using a spotted border die, adding a pop of pink. I used Distress Ink to blend the border and punched it with a Martha Stewart punch. The bottom is a bit frilly but never mind. Because the border is a bit fussy I decided to use the a Tim Holtz sticker sentiment. I usually cut these up and use them stacked but I like how it spans the full thing. And it's perfect. 

Looking forward to seeing what everyone else does with it! 


Saturday, 18 August 2018

Project: Fairies and bugs for Sketch Saturday


This is one of the first times I've played along and got to play with my own sketch. Hilariously it's one of the hardest sketches I've ever played. Oy vey.


So this is what I came up with - after a few attempts I should add! I kept the sketch the same but played on a landscape layout as I struggled with the portrait approach. The image is from Paper Shelter, our sponsor this week, and I colored her with ProMarkers. Because she's a bit ethereal and sweet I decided to play with that and use some fun bug stanps. The bugs are from a little stamp set I got in a sale years ago, and I love how much color and weird perspective they bring. I added a little Tim Holtz sticker for the sentiment. and then die cut it so I could get a little dotted border.

Hopefully you like playing along with it as well!

Sunday, 5 August 2018

Project: Unicorns and dinosaur new kit


Claire gave me some amazing new stamps this week and I had to play with them straight away. The hero is this dinosaur on roller skates and the funniest little sentiments came with it. I tried a few layouts but decided the one you see here was the best. I blended a scrap of white paper with Distress Ink and them stamped on top in Distress Oxide for a chalky finish, and die cut him out.

The graph paper is actually a scrap and I thought it was perfect to give this a bit more masculinity. The 'Roar!' works well on the graph as you can see it through the text and to enhance the look I did a hand-drawn border around the card to make it look more intentional and not like it as too small a background sheet (which is kind of what it was...)


Now for some unicorns. This sentiment is too much fun - it actually says 'I am a unicorn (for reals)' but I masked that because I thought it was stronger without it. For a sense of scale, this is a 3x3 mini square and I wanted to make sure the unicorn die fit above the sentiment. The image is a Lawn Fawn Christmas set (if you'll believe it) and I had already stamped and die cut a few from last year's Christmas assembly line. I colored the accents and added a Wink of Stella.


The background is blended Distress Oxide. I tried a few variants as you can see in these, I think I like the pink and yellow the best. I also tried colouring in the letters of the sentiment or accenting them with shimmer but decided that the plain version was the best.

These are such fun additions to my kit, I'm kind of surprised I was able to do anything else as I stayed at my desk nearly the full weekend!


Tuesday, 31 July 2018

Project: Love bug dragonfly sketch card


The sketch this week at CAS(E) This Sketch caught my eye and I spent a ridiculous amount of time going through my craft stash finding the right combo of papers and objects for my layout. Honestly, sometimes the brain is just too full of ideas!


I wanted something that would be fun and modern, feminine but not too girly. I decided a dragonfly was the perfect object for the central feature and I die cut it using a great mustard color stock. It's actually two dies - sometimes I do contrasting colors but since I knew I'd be adding busy papers I went for both layers in the same color just for texture. The papers are from a little 4x4 paper set I was given and it's great because being the same set the turquoise colors are exactly the same.

The sentiment is from a little insect set I bought in a sale years and years ago - it's such a sweet little greeting that I thought it was perfect for the finished piece. Very happy with this layout, I may just use it as inspiration for a few more cards...


Thursday, 5 July 2018

Project: Two takes on animal cards


This weekend I had a playdate with Claire and she talked me through using a new pull-off die she sent me and I decided it would be perfect to play with my fun little marching band animal set.

I started by die cutting the white strip on a scrap so I could see how it worked. I chose far too small a scrap so that limited my ability to choose the rest of the components! I know this for next time...I then stamped, colored and die-cut the animals. I stamped the first part of the sentiment on the tab of the pull-off and then on the backing piece added 'happy birthday' so there is a good reveal. I mean, it's an obvious one but I think the big adult kids in my life will love it.


This one has nothing to do with the first but as I was playing with Claire I decided to do some stencilling over a stamped image. See this post of her's for the inspiration she gave me! I stamped the hummingbird first and then stencilled over it using a mosaic Tim Holtz stencil with Distress Ink. I used his range of stickers as well as a bit of fun. Then I went old school and added twine and candies - it's like the cards I used to make in layout but with some more contemporary techniques. 

Playdates always encourage me to use the newer and more challenging tools! 

Monday, 23 April 2018

Project: Cheerful yellow cards


This weekend I had a little play at my desk and I am so pleased with this card. I have a little 2 year old friend who's birthday is on the horizon and I decided her card needed to be lots of fun. She loves animals and I regularly buy her books and toys that make animal sounds as she's great at mimicking them. She also speaks 3 languages (at 2!) and it's fun to get her to say the names of animals in different languages.

I decided to use the lovely Avery Elle set that has these amazing musical animals. I colored them with ProMarkers and die cut them out. My kangaroo is a bit poorly cut but I doubt she'll notice if I'm honest! I used a number 2 sticker I had in the stash and decided to forego the sentiment. Just a big number for kiddos - they don't have to worry about reading but get to see the number. I went for a yellow background as it's cheerful and gender neutral - she's not an overly pink girl so this works well.

And now a bonus card. This clear transparency came with something - a package? an item of clothing? I can't remember - and I kept it on my desk for nearly a year. I've been thinking it would be a lovely shaker card but couldn't decide what to do with it. I decided in the end to leave it on its own. I stencilled the background in Peacock Feathers distress ink to give it a bit of colour. Probably a touch too much but oh well! I added a big yellow foam ring and added some gold and silver sequins.

The transparency went over the card and then I added a big yellow chevron ribbon with a knot to mask the edge of the transparency that I didn't glue down - it was getting gummy and weird and I needed to hide it. It's a bit random and weird but then again it's a shaker so whoever gets it can have a bit of a laugh. Really fun day of playing with yellow in different ways.


Saturday, 17 March 2018

Project: A foxy card for Sketch Saturday


I have been on a bit of a mission to use more of my patterned papers this year and so the sketch this week at Sketch Saturday is perfect for a strong featured background.

Our sponsor this week is Oddball Art Co and I loved this little Mr Sweets the Fox image. I colored him with ProMarkers and then die cut out the oval. I added a touch of glitter glue to the heart and some Wink of Stella shimmer to the tail. The sentiment is an ancient one from my stash, must be at least 3 or 4 years now.

The little border details are a grey satin ribbon and some plastic red gems. The paper came from a set from Claire. I had added a few more touches but I took them off - gotta know when to call it quits and leave the project alone!

Hope you enjoy the sketch and play along! x


Sunday, 18 February 2018

Project 461: Masked blending animal cards


I had a play at my desk this weekend and decided to make a very card for a good friend. They both feature some masked blended features and fussy cut components. The headline features two stamp sets, the sentiment and rocket are from one set that is over 4 years old. The planet admittedly  was a new gift from Claire this Christmas. I heat embossed them, coloured them using Gelatos and a water brush and then fussy cut them out. I masked a circle and used Distress Oxides in two colours to get the space sky. I splattered it with water drops to give it bleached stars and then added actual stars to make it a bit more bright and cheerful.

Because of all the little dots and circles I thought I would enter it in the Retro Rubber blog challenge this week.


I had the chance to make another little card so I include this here as a bonus. I saw this Pinterest post and even though I lacked a panda stamp I thought it would be simple enough to try and draw. It's not my best freehand work but I think it's playful enough to be ok. I masked a stripe and used Picked Raspberry Distress Ink to make it nice and bright. I used a sentiment from Stampin' Up that is a couple of years old now. Maybe 3? The banner was stamped and then fussy cut out. I added little stars from the same Stampin' Up set. The little detail on the border of the die actually makes it fit the spots and dots theme as well which is a happy accident!


Saturday, 17 February 2018

Project: A little Valentine sketch


Happy Saturday -another day at Sketch Saturday! This week we have one of our favorite sponsors joining us this week, Just Me Digital Stamps. 


I thought the sketch was fun but I decided to rotate it and put it on its side, and that opened a world of possibilities. I colored the image using Spectrum Noir pencils and then die cut it out. I added little colored hearts to match the flag that I punched ages ago, I have a giant collection of pre-punched shapes that I always forget about. I added a little star to one to match the sketch, loved working with it. 

Can't wait to see what others do with it! 


Saturday, 3 February 2018

Project: A frog pile up sketch


Welcome to another week at Sketch Saturday!
We have an amazing sponsor joining us again this week: 


I saw this great image, a little totem of frogs called Frog Pile Up and I thought yes, that's perfect. I used a backing paper that I have had for ages and thought it would be perfect for the green and blues I wanted to feature. I colored it using colored pencils and then, unhappy with it I went over it in Promarkers. I added a scallop circle to give it a touch of cuteness. The stitched banner is from Recollections and has been in my stash for ages, I thought it worked really well here. 

Can't wait to see what other people have done with the sketch this week! 

Saturday, 6 January 2018

Project 451: A kid's card for Sketch Saturday


Welcome back to another Saturday with Sketch Saturday! This week's sketch is going to be a fun one, the possibilities are pretty endless.


This week's sponsor is Di’s Digi Stamps
and the winner's prize: $12 Voucher to Di's Digi Stamps Shop


I had so many ideas it took me ages to finally commit to this Mama Elephant dog stamp and die set which will be my godson's 6th birthday card. I used a green card blank and then used some bold colored papers die cut into squares for the background. The dogs were die cut and then colored using ProMarkers to match the little boy's two favourite dogs: Einstein on the left (our friend's border collie) and Zippy on the right (my cowhide-coloured Jack Russell Terrier).

I added some baker's twine in turquoise to match the sparkly 6 and added a puffy peel-off sentiment. I haven't used these in ages but I thought it would add a bit of texture.  Finally I added some tiny glue dots to the corners to complete the sketch. If it were an adult card I probably wouldn't have bothered but kids love texture, they don't care about things matching!

Hope you have fun playing with the sketch, looking forward to everyone's creations!

Thursday, 23 November 2017

Project: Christmas animals at MAWTT


Hello and happy almost December to you all!

This week at Moving Along with the Times we are celebrating our seasonality by asking for a challenge with festive animals. Hope that will inspire some fun projects for you. 

For mine, I decided to do something different. I have loads of Christmas stamps, loads of images and I thought, why go down the easy route when we could make this harder? :-P So I decided to shop my stash and take a non-Christmas image and turn it into one. I started with a Bugaboo Squirrel image and colored him using Spectrum Noir pencils. I die cut him and added another scallop die behind him. The background paper is an old one that I have had for a while and is particularly hard to work with. I love the colors but I can never find the right image - I decided that now was the time. 

To make it more festive, I added a die cut sentiment from a Tim Holtz set, and then added a little Jolee Boutique candy cane sticker - I think this one might have come from Claire as she knows I love her stickers. I'm actually really pleased with this, it looks really cozy and that's what we want from the holidays, isn't it? 

Wednesday, 27 September 2017

Project 440: A foxy shaker card and train silhouette


My buddy Dave at work always asks me to make him funny cards for his family. He asked me to make his girlfriend a fox card and his dad a train card.

For absolutely no reason, I decided to make the fox card a shaker. I just thought, why not? I haven't made a shaker in a while, this will be fun! And then I saw that CAS-UAL Fridays was hosting a shaker challenge so that confirmed my commitment.

Plus, while it looks simple, there are about 6 uses of dies on this card (the background square with circle removed, the acetate circle, the scallop with the ring cut out, the foam ring) so I'm entering the CAS On Sunday challenge of 'Use a Die'.

I colored a Unity Co stamp directly on the card blank and then die cut a piece of paper around it. I die cut a foam ring in red to hold the sequins and then layered on top a scalloped circle with a die cut out as a frame. I added a hand drawn border and a little printed tag that Claire had given me as a sentiment. Really pleased with it as I struggle with shakers and I was patient enough to wait for all the glue to dry on the foam and the lid before shaking it so I didn't get the sequins stuck around the edges like usual!


Now for the train. I tried my hand a paper cutting one from sight and it came out a bit sloppy and un-train-like. So I cheated a bit, printed out a train image, glued it to a black card and then cut it out as a stencil and then flipped it over. Still, I had to do it by hand so I think it's ok! The paper is an ancient one from my stash (I think it's Recollections a few years ago). I cut the tag and used Distress Inks to blend over it to give it the vintage leather feel. The stamp is a really new one from Paper Source (I indulged when I went to the US recently!) and I think it may be it's inaugural use. I added some black bling and a gold glitter dot for the train's light.

Really happy with both of them and can't wait to give them to my colleague.


Thursday, 3 August 2017

Project: Things that fly at MAWTT


I have been making a lot of cards lately that involve birds, butterflies, hot air balloons, and I realised that I seem to be obsessed with things that fly. I thought it would be the perfect challenge for Moving Along with the Times this week!

My card features a set of bug stamps that I heat embossed in black. I put them on a strip of watercolour paper that I painted using an aqua brush and Distress Inks. I tried to choose colors associated with that particular bug and I'm really happy with the combination. I added a sentiment from Tim Holtz idea-ology stickers that I thought worked well for the set. I tried it on white, black and kraft card and decided black looked best.

Saturday, 24 June 2017

Project: Sketch Saturday 24th June


Hello and welcome to another fun Saturday challenge at Sketch Saturday!

Here's the sketch:


This week's challenge is sponsored by Just Me Digital Stamps and her images are gorgeous. I'm featuring Fantastic Mr Fox and he's such a cutie.

I decided to make the image sentiment nice and big, and then colored it with ProMarkers. The brown card is embossed using a woodgrain folder. The green vine is a Martha Stewart punch that I punched in dark green card and then carefully cut down the line - it's supposed to be twice as wide and I thought it would work well as a border if I got it a bit smaller.

I had such fun playing with the sketch, I hope you do to. Be sure to enter before Friday!


Monday, 12 June 2017

Project 422: A summery sketch and color challenge


I haven't been doing too many challenges outside of my DT challenges lately as I've been bogged down with work and family commitments. But this weekend I was keen to play with some of my stash so I found some great challenges to make it more fun.


I decided to combine Freshly Made Sketches' layout with the color combo at The Color Throwdown:


The result is the summery card above! The image is from Stampin' Up and I colored it with ProMarkers, added some white gel pen accents and then die cut it into a circle. The paper is from American Crafts and is one of my favourites, I have been saving a small scrap for absolute ages. I added little touches of yellow in the dots and added sand to make it a bit more prominent. Really pleased with it, I think it's a fun little summer card!

Tuesday, 6 June 2017

Project 420: Set of daschund cards


I stayed home today as I wasn't feeling well and then, of all things, we got a leak in through the lighting and the ceiling  from torrential rain hitting our apartment building. Ugh. So I had to turn off the power, turn off the lights and wait for the building manager to come investigate.

So I made some cards while I waited! I have been wanting to make a set of cards for a family friend who loves daschunds for a while and thought it would be fun to have a little play. I stamped the four different dogs from a set Claire gave me, colored them with ProMarkers and then die cut them as squares. I also cut a spotted background and plain square and instead of a straight layer, I skewed it a bit.

I added punched balloons to the three that had strings - I thought it would add dimension instead of a stamped balloon. And some little enamel dots and that was that. Really happy with the set, I can't wait to put them in the post for our friend.

Saturday, 25 February 2017

Project 399: A cute little sketch and baby card


Since Christmas I've been struggling for mojo at my craft desk and dipping in and out of challenges less frequently than my usual behaviour. But I really liked the layout at Sketch Saturday and tasked myself to use paper scraps as I wanted to see what I could come up with.


The whole idea came out of the heart paper, I just love the color combos and how sweet they are. It was a gift from Claire this summer and I've been a bit precious about that set - but as this is a scrap I used a fairly big piece guilt free. The green piece is also a scrap and I embossed him using an ancient diamond folder, one of the very first embossing folders I ever got. The sweet hello is from a set that I bought off of Jenn Shurkas who was selling off her old stash and I got in there lightning quick! I punched a little heart and covered it in Enamel Accents to give it a bit texture as all the paper looked a bit flat. 


This one doesn't work to the challenge but as I used the same scraps (hearts and pink border) I thought I'd showcase it here as a freebie. The elephant is a stamp/die from Sizzix that I got in the Black Friday sale, and the sentiment is the same set. The backing paper is a scrap from the Neapolitan stack from Recollections that I have been so precious with but as this is for a colleague I decided to get over myself and just use it! The little white enamel dots add a bit of lightness. 

As I was struggling this weekend I wanted a craft session to be super simple and not too fussy and I'm happy with the result of both of these :) 

Wednesday, 8 February 2017

Project 394: Animal birthday and valentine cards


I got so much lovely stash for my birthday from Claire that when I got home I wanted to play with everything. My mojo hasn't been up to scratch lately and I thought it would be fun to make just a few things and not get too stressed about it.

The headline card is a birthday card for a friend who shares my birthday (today!) featuring Bugaboo pigs, stitched dies from Claire's Christmas present and a gorgeous background stamp that I inked in Salty Ocean Distress Ink and spritzed. The pigs are colored with ProMarkers.


The second card here features a new Valentine set. I embossed the little paws in white, blended over it in Candied Apple Distress Ink. I fussy cut the stamp and then stamped a sentiment combining three of the messages together. There are so many little sentiment options with this set, it's really sweet. I added the little strip of red gems, I'm not sure it's in keeping with the rest but oh well!

It took me a while to get back into the swing of things but I had a lot of fun with these two. hopefully the inspiration will come back as I play with all my other new things!