Monday 22 April 2013

Project 78: See you later, Mrs G


This post is an elaborate public thanks to my friend Claire, who is moving to the US for an adventure in NYC with her husband.

She introduced me to the wonderful (and expensive) world of crafting and helped shape what was a time-consuming past time into an even more time-consuming (but occassionally financially beneficial) hobby.

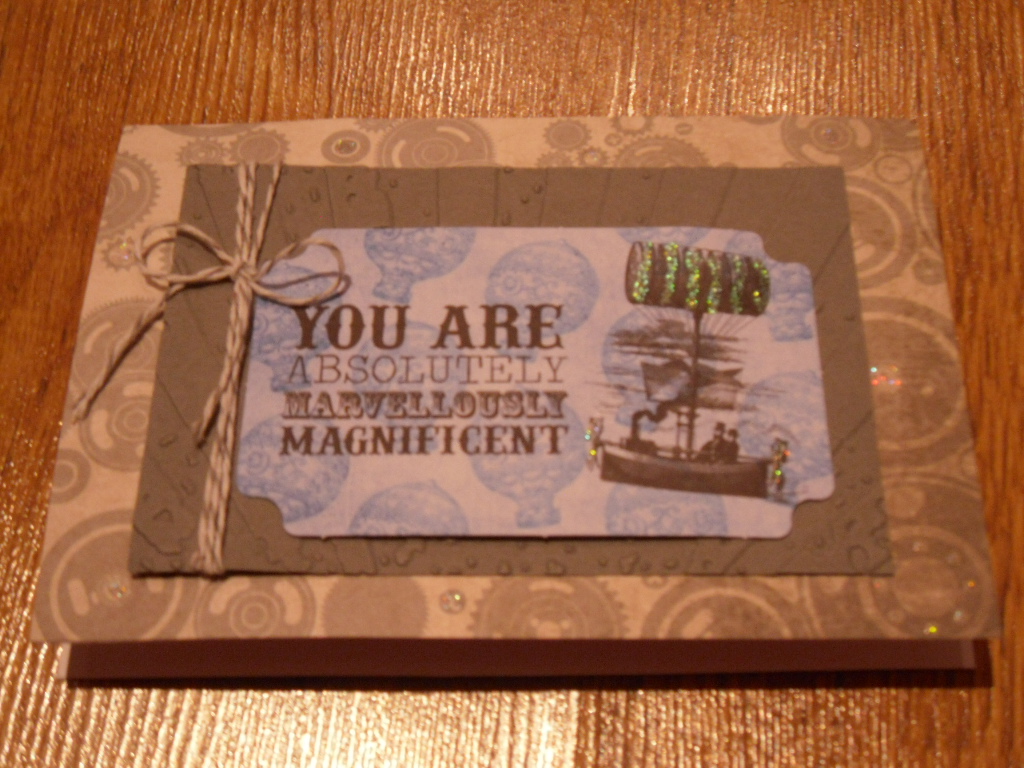
I had the idea for this card ages ago and I thought that I'd dissect it now in all the ways that my crafting has changed since I started having playdates with Claire.

1) Mojo Monday layout: I never knew craft blog challenges would become such a fun weekly experiment, an opportunity to try new layouts and see how other people interpret the same brief. Awesome. Sketch is below to see my interpretation.


2) Punched scallop squares - I thought punches were funny things for children and had no idea that there was a world of punches to make crafters' lives easier. I've never looked back and now have a punch box that weighs about 20lbs.

3) Individual letter stamps - so much cuter to make your own weird and wonderful greetings. Like this one. I'm sure a "See you later, alligator" stamp must exist but it wouldn't have worked with this layout and I almost certainly wouldn't have been able to have my gator eating my greeting with a pre-made one.

4) Every color of ink - goes with the pervious point but having ink in just about every color gives you just that extra bit of flexibility. (And you can get good cheap ones in lots of colors from craft store sales - another good tip from my craft buddy.)

5) The patterned paper at the bottom is a freebie from a craft magazine - I never would have indulged in a craft magazine before but now I evaluate them for their freebies (they all have freebies) and see if I'd pay the cover price for the freebie. I've gotten stamps, papers, bling, ribbon, candies...all sorts.And then the magazine is like your freebie. Cash back.

6) The green paper that is punched is high quality stock which is never saved for best. Life's to short to save everything for best. I used to use cheap nasty paper and then save my scraps to the tiniest fraction of an inch and for what? So I could look at it longingly? No way. Good cards use good paper. End of story.

7) Paper twine is like a dream - it ties so easily, you can manipulate it as you please and it adds charm where ribbon can look twee. I wanted to emboss the yellow paper underneath to show another Claire-influence but it was too much. And that's another thing that Claire affirmed - you don't need to use every piece of craft kit on a single card! Sheesh. If I had a dime for every card that should have stopped 6 embellishments ago...well I'd be able to buy a lot more Martha craft kit. That's for sure.

8) Buttons as embellishments - I love buttons and never would have built up a collection to put on cards. Now I put them everywhere. Freakin' love buttons.

9) Glitter glue (barely visible in the center of the flowers on the bottom paper) - ok, I'm a late convert here but I thought glitter glue was for 8 year olds to decorate tshirts in Brownies or something. It really lifts a flat stamp or paper and I can't remember why I didn't start using it sooner.

10) The alligator is all mine, I hand cut that from corrugated card, cut the teeth and eye and generally spent longer on that element than anything else - as you'd imagine. But I had to put something outrageous on there for her!

I hope this post demonstrates in a small way how much I've learned from my friend and how much my craft life is going to have a Claire-shaped hole. But I'm so excited for her and know that this is just an excuse to work out the logistics of a Skype playdate. Will definitely continue to link to her blog so you can see what we create in our trans-Atlantic partnership :)


Sunday 7 April 2013

Project 77: Little Claire stamped cards


 Claire gave me a subscription to a stamp club called Little Claire and I've just received my 3rd installment. I love getting them as they are more intricate than stamps I'd normally buy, challenging me to stretch my skills a bit. Also, they always come with a small selection of papers, ribbon, candies and a card blank as well as a few layout ideas to use them. Great little set - I really recommend it and I think I will keep the subscription up after my present from Claire expires.

The headline card is one for my grandma for Mother's Day. I was inspired by the Japanese Cherry Blossom season and pictures I've seen in the last week and thought it would be nice to use the lacey doiley as the background layered over pale green card. I made the X shape accidentally when I was cutting out the stamp so I mimicked it in pink to get the X effect. Happy "oops" moment there.The flowers are punched out using the punch that Claire and I "share". I wonder if that's going to America with her...*cough*


Next is a layout that I just love. I played with this cut-out technique after seeing it in a card magazine and I think it really lifts these boxes. I put two squares (top left and bottom right) on foam to add some dimension. I used the paper raffia-style thread and layered a triple backing behind it after embossig the blue card to bring together all the colors. I used my Martha scallop punch to make it a bit playful.

This one is going to be an engagement card for my cousin Megan. The stamped heart tree might be a bit too cute for her so I thought I'd punk it up a bit with the colored zebra paper.

I made this little ginger cat card for my friend Beth to cheer her up as she's been unwell lately and she loves her ginger cats. Really simple layout, I used the isolation of the cat on the post idea from Claire's card here and I think it loks cute against the spots.


Finally this one isn't a Little Claire stamp but it is a stamp all the same! My friend Palo gave me a commission to make her little brother a birthday card. He loves rockets, aliens, robots and Buzz Lightyear. So obviously we'd get along. I hope this meets her brief. I kind of want to keep it but I think as she's a friend I'll be willing to part with it...

So a bit more complicated than normal but I wanted a leisurely Sunday of crafting and I got it.
Happy start to the week.

Friday 5 April 2013

Project 76: Best of the final Playdate


Although it breaks my heart that my craft buddy is moving to the US, we decided we should have a big playdate to get over our sadness and celebrate the joy of like-minded crafting. 

Here are the highlights from what was a great session. 


The headline card is my favourite from the day - a little stamped fox with a bit of country chic paper, candies and a natural card base. 


Next Claire challenged us to use these little dog tags so I made a fake collar and bling-ed it up with some gold glitter glue to mimic a real dog tag. I think any dog lover would like that!


This one plays on the steampunk trend and I have this in mind for a friend's birthday. I textured the grey card with a really funky starburst embossing folder and then hand glittered the greeting and some of the cogs on the background paper. I love the bakers' twine on the side, adds a feminine touch I think.


I had spied these layered flowers on Claire's blog last week and insisted that she teach me. They are dead easy - just two die cut flower shapes layered up in alternating papers. Must get one of those die sets...


Finally a little playful moustache card using the same stamp set as the fox and stamped greeting. I thought I'd keep this simple with a patterned border and some candies. No need to fuss this one up, the moustache does it all. The oval that it's stamped on was the die-cut centre of a frame that Claire punched out - all about up cycling the scraps! 

There were a few other cards that I wasn't as proud of, including a Mojo entry that just went wrong. All sorts of wrong. Maybe next week it will work a bit better for me. 

I forgot to post this last week, but we had a bit of Easter crafting as well - hope the bunny was as good to you as we were to our family!