Showing posts with label Distress inks. Show all posts

Saturday, 16 February 2019

Project: A mermaid birthday card


Hello and happy Saturday! This week we have a fun sketch to play along with at Sketch Saturday. The sponsor is one of my personal favourites, The Paper Nest Dolls.


I started by colouring the image with Spectrum Noir pencils, I really wanted a gradient effect and found the blending easier with pencil than with marker. I have a mermaid-obsessed friend so I went with colours I knew she would like.

I decided to make the left hand panel blended Distress Oxides and got another gradient. You can't have too many rainbow/ombre effects with a mermaid card. Fact. The sentiment is a modern one that I got in a sale last summer and it is perfect for this card. It's modern and silly and completes the sketch really well.

Super happy with the result, can't wait to see what people play along with!

Saturday, 2 February 2019

Project: A bee fairy for Sketch Saturday


Hello and happy Saturday! We have a great sketch for you at Sketch Saturday designed by the talented Mrs G

Our sponsor is Star Stampz and I just fell in love with this little bee fairy, I thought she was great. 

I decided to colour her with Spectrum Noir pencils and then cut her out and put her against a black background. The yellow card was stencilled with a honeycomb pattern and distress ink. The sentiment is an ancient one from my stash. I love how it came together, black, white and yellow are a favourite crafting combo and I think it works really well with the sentiment. Hope you have fun playing along! 


Friday, 28 September 2018

Project: Birthday card with all the skills


The trouble with one of your best friends being a card maker is that you really have to pull out all the stops for their birthday card each year. It can't be some 'threw it together this morning as I forgot' nonsense that I get away with on other friends. Nope. For Claire, I have to make it technical and complicated!

So this year I was thinking what to do and I was reminded of a technique we did when we first started out - stamping over a few layers and splitting them out in the layout. We used to do this literally over multiple sheets but I wanted to feature dies so instead I did a layout over one sheet that I could cut out with nesting dies. 

I used a Studio Calico sentiment in the middle and then used some big graphic flower stamps from a magazine freebie arranged around the edges. I heat embossed everything in black, then blended using Distress Inks. I layered up the spotted rectangle dies because I liked the little dot details that it brought to the layout - makes it feel a bit more contemporary and tropical. I layered them up using foam tape and over a black card to make it stand out and tie back with the embossing. 

Happy birthday to my dear friend for life, Claire, who is crazy and loving and generous and brilliant. Love you man. The dog loves you most. x

Sunday, 5 August 2018

Project: Unicorns and dinosaur new kit


Claire gave me some amazing new stamps this week and I had to play with them straight away. The hero is this dinosaur on roller skates and the funniest little sentiments came with it. I tried a few layouts but decided the one you see here was the best. I blended a scrap of white paper with Distress Ink and them stamped on top in Distress Oxide for a chalky finish, and die cut him out.

The graph paper is actually a scrap and I thought it was perfect to give this a bit more masculinity. The 'Roar!' works well on the graph as you can see it through the text and to enhance the look I did a hand-drawn border around the card to make it look more intentional and not like it as too small a background sheet (which is kind of what it was...)


Now for some unicorns. This sentiment is too much fun - it actually says 'I am a unicorn (for reals)' but I masked that because I thought it was stronger without it. For a sense of scale, this is a 3x3 mini square and I wanted to make sure the unicorn die fit above the sentiment. The image is a Lawn Fawn Christmas set (if you'll believe it) and I had already stamped and die cut a few from last year's Christmas assembly line. I colored the accents and added a Wink of Stella.


The background is blended Distress Oxide. I tried a few variants as you can see in these, I think I like the pink and yellow the best. I also tried colouring in the letters of the sentiment or accenting them with shimmer but decided that the plain version was the best.

These are such fun additions to my kit, I'm kind of surprised I was able to do anything else as I stayed at my desk nearly the full weekend!


Thursday, 5 July 2018

Project: Two takes on animal cards


This weekend I had a playdate with Claire and she talked me through using a new pull-off die she sent me and I decided it would be perfect to play with my fun little marching band animal set.

I started by die cutting the white strip on a scrap so I could see how it worked. I chose far too small a scrap so that limited my ability to choose the rest of the components! I know this for next time...I then stamped, colored and die-cut the animals. I stamped the first part of the sentiment on the tab of the pull-off and then on the backing piece added 'happy birthday' so there is a good reveal. I mean, it's an obvious one but I think the big adult kids in my life will love it.


This one has nothing to do with the first but as I was playing with Claire I decided to do some stencilling over a stamped image. See this post of her's for the inspiration she gave me! I stamped the hummingbird first and then stencilled over it using a mosaic Tim Holtz stencil with Distress Ink. I used his range of stickers as well as a bit of fun. Then I went old school and added twine and candies - it's like the cards I used to make in layout but with some more contemporary techniques. 

Playdates always encourage me to use the newer and more challenging tools! 

Monday, 2 July 2018

Project: a Hamilton 30th and mega bling


So these cards are totally different but I made them at the same time and decided it would be fun to blog about them both at the same time.

The Hamilton card is for a colleague (and friend) turning 30 who - like me - is obsessed with the musical. We listen at work, discuss the characters, compare London and Broadway cast members...we're totally nuts for it. I decided too get out the scalpel and do a bit of paper cutting for the figure on top, then added the star die beneath. The background is blended using Distress Oxides as I wanted the same aged effect as the famous poster.


This congrats card is completely different! I used a great pattern paper and die cut a small square. I created a ring out of glitter stock using two different circle dies and added my mega bling on top. That is actually a rhinestone from a necklace that broke so it looks a bit rough in person but I liked the effect. The congrats sticker is from a big pack I got at Hema.

I had so much fun making them and as they're both for personal friends I'm sure they'll be thrilled with them as well.

Monday, 18 June 2018

Project: Smooshed paper wine cards


Last week two of my colleagues put together a wine night for our office and, honestly, I don't think I've had that much fun in the office...ever. It was an absolute hit. We went on until 11pm, just laughing and seeing where we could get a restaurant to deliver us wine when we went beyond what was originally catered.

I wanted to make thank you cards for the two who organized it and I have this great Simon Says Stamp set that works so well. I started with a small square card blank and used Distress Oxides to create a smooshed pattern for the background. I then used my I-wish-I-were-a-Misti to get a super crisp black impression from the stamps. It was quick and easy to get two done and I think they are spot on. I just hope it inspires them to do another wine night!

Sunday, 17 June 2018

Project: Blended texture paste star card


I loved the layout at CAS(E) This Sketch this week, I had so many ideas but ended up going with one of the simplest:


I started with a piece of graph paper and blended it with Distress Oxides for a chalky finish. I then added silver Nuvo glitter paste through a star stencil for an irregular spray of sparkly stars. The sentiment is from a Lawn Fawn set that I got second-hand from a demonstrator.

I love playing with a few techniques in one go, and getting to sneak in glitter and a rainbow will always make the exercise a bit more fun!

Saturday, 16 June 2018

Project: A blended rock and roll sketch card


It's my father-in-law's birthday this week and I wanted to make him a music-related card to reflect his favourite hobby. I found the sketch at Freshly Made Sketches perfect as I have a record stamp that works brilliantly for the layout:

I started by blending the card base with Distress Oxides and giving them a splash of water for a splattered effect. I then masked off a central panel and then stamped the Happy Birthday records over it. I got a really neat dissolve effect from the mask that was technically an error but I love it. I then added a sentiment that is perfect for the rock and roll theme. It's really CAS and masculine and I think my FIL is going to love it. 

Monday, 4 June 2018

Project: Blended giraffe with a stamped border


I got this freebie set of wild animal stamps and it came with a border stamp that I loved but couldn't figure out how to use. I have so many like this and I never know what o do with them! In the magazine there was a card made using the border and I thought, you know what, let's give that a go.

I blended the card using Distress Inks and then stamped the border on top. Quite tricky at times to line it up but I was happy with the result. I think next time I will be really meticulous and measure the space to fill it out. But it's ok for now. I added the giraffe from the set to the middle as I had kept the panel quite narrow and thought it fit the space perfectly.

I've left off a greeting - for now - as I couldn't make up my mind about what to use this for. But I love the colors and way it came out, some good learnings for next time.

Thursday, 24 May 2018

Project: Black, white and color at MAWTT


This week at MAWTT I got to choose the theme which was really fun. I love doing a colour pop so I thought black, white and one colour would be a fun one - thanks for playing along.

For my card I stencilled a yellow hexagon pattern and then die cut a black hexagon that was embossed with dots. I stamped the bee and fussy cut it out, colouring the stripes with ProMarkers. The sentiment is an old Sizzix one that I kind of forgot I had - I think it works well to have some curlicue against the hard edges of all the hexagons.

All in all I am really happy with it and hope it provides some inspiration for everyone playing along this week! 

Sunday, 13 May 2018

Project: A lovely Bridal Shower challenge entry


I decided to play along with some challenges this weekend to make a Bridal Shower card for one of my best friends. She's Beatle-mad and I thought this All You Need is Love sentiment + die set would be perfect - I just needed to make a card around it.

So the combination of colors at The Paper Players and the layout at CAS(E) This Sketch were a perfect combo as she loves pink and orange:


I made an umbrella out of pink and orange papers to go with the 'Shower' theme (it is tradition after all) and I used a heart stencil to add some raining hearts to the background paper. I die cut the 'love' sentiment in yellow and orange for texture. I added a lime green border of heart scallops to add the fourth colour.

So while it's a wedding card it is super summery and cheerful - not the usual white-on-white. I think she'll like it and it was a fun way to get some inspiration this weekend.

Saturday, 5 May 2018

Project: Masculine sketch birthday card


I saw the sketch at CAS(E) This Sketch and loved it. I had a lot of ideas to use stamps and punches and stencils but I decided to keep it really simple.


I masked off two stripes and used Distress Ink to blend in the stripes. I used Peacock Feathers and Blueprint Sketch to make it really vivid.

The sentiment and texture stamps are from Studio Calico. I added Enamel Accents in white to the Y on both lines to add extra texture.

It's masculine and fresh and I'm giving it to my boss for his birthday on Monday. Maybe it'll be good enough for a bonus. Ha!

Sunday, 8 April 2018

Project: Arty little birthday card


This is a card that I started when I was in the US playing with Claire at Crop on the Cape. I made a bunch of backgrounds with Distress Inks and started stamping on some of them. I used one of Claire's sentiments and then the balloons from the Stampin' Up set that is an old favourite.

I love the effect, and even though it doesn't appear in the photo there are some great dimensions with Wink of Stella shimmer on the balloon. I love making cards like this, such a fun way to get color and texture together.

Thursday, 1 March 2018

Project: A rainbow texture paste card for MAWTT


I absolutely LOVE our rainbow challenge at Moving Along with the Times this week. I decided to do something a bit artsy and I loved where I ended up. I used a big block stripe stencil to create my rainbow with Distress Oxides.

I then used a cloud stencil with white texture paste to create the clouds. I went over them a few times and I liked the texture being a bit irregular. I had to be very careful to make sure the clouds were fairly consistent as the thin initial layers were too transparent and didn't look white enough. The sentiment is one I got second hand and I think it works so well with the layout.

I wanted to keep everything else simple - I tried bling and glitter and all sorts of things but decided clean was the best way.

Hope the challenge inspires your entries as well!

Monday, 26 February 2018

Project 463: A country-walk inspired card


A colleague asked if I would make a card as a thank you for a weekend stay in the country. Specifically they wanted a card that was country-inspired without featuring too many flowers or animals.

The headline card was the one inspired by the brief. I used two magazine freebies to create the tree and fence scene which I heat embossed in black. I blended the background after die cutting the rectangle to make it a bit more atmospheric, I added the sentiment and birds using dye ink instead of embossing as I wanted the textures to be different. The touch of string was to add texture though truthfully I don't love it now!


This was another card I was just playing around with on my desk and it doesn't really work with the brief (too flowery) but I do like the simplicity. I die cut the tree and used distress ink to get the color and texture. I added these sweet little flowers that I got at Michael's just after christmas. I was going to add them to a square but decided the hexagon was a bit more modern. The thank you is also a magazine freebie.

A fun little session and a good mid-week brief.

Sunday, 25 February 2018

Project 462: A celebration sketch card


I saw the challenge at Freshly Made Sketches this week and thought it would be a fun one at my desk.

I remembered the champagne bottle die and thought it would be a good one for the big shape. Gosh I forgot how fussy that die is! I used thicker card, a black glittery stock that I had a final scrap of in my stash. I ended up having to use a fair amount of scalpel cutting to get it to come away, and I put it through the machine a good few times. Still. It makes an impact.

For the left hand side I used a diamond stencil that was new from my birthday present from Claire. I used distress ink to get the color variance. The little oval tag features a sentiment that is ancient in my stash.

With the fussy cut of the die, this ended up taking a lot longer than expected. But never mind, it's still a fun card for the challenge!

Sunday, 18 February 2018

Project 461: Masked blending animal cards


I had a play at my desk this weekend and decided to make a very card for a good friend. They both feature some masked blended features and fussy cut components. The headline features two stamp sets, the sentiment and rocket are from one set that is over 4 years old. The planet admittedly  was a new gift from Claire this Christmas. I heat embossed them, coloured them using Gelatos and a water brush and then fussy cut them out. I masked a circle and used Distress Oxides in two colours to get the space sky. I splattered it with water drops to give it bleached stars and then added actual stars to make it a bit more bright and cheerful.

Because of all the little dots and circles I thought I would enter it in the Retro Rubber blog challenge this week.


I had the chance to make another little card so I include this here as a bonus. I saw this Pinterest post and even though I lacked a panda stamp I thought it would be simple enough to try and draw. It's not my best freehand work but I think it's playful enough to be ok. I masked a stripe and used Picked Raspberry Distress Ink to make it nice and bright. I used a sentiment from Stampin' Up that is a couple of years old now. Maybe 3? The banner was stamped and then fussy cut out. I added little stars from the same Stampin' Up set. The little detail on the border of the die actually makes it fit the spots and dots theme as well which is a happy accident!


Monday, 29 January 2018

Project 459: A London thank you


A colleague just bought a house and had to ask a massive favour of another colleague in order to make it work. She wanted a thank you that was deeply personal and after talking to her about it we decided a watercolour London scene was exactly the right note.

I started by heat embossing the Tim Holtz stamp from Claire on watercolour paper. Then I used Distress Inks and a water brush to get a grey and blue sky effect. I added a Mama Elephant thank you set in the corner that would offset the skyline and hold its own.

I decided to triple mount it for a touch more elegance. Really happy with it and my colleague loves it too. A lovely little art project.

Monday, 22 January 2018

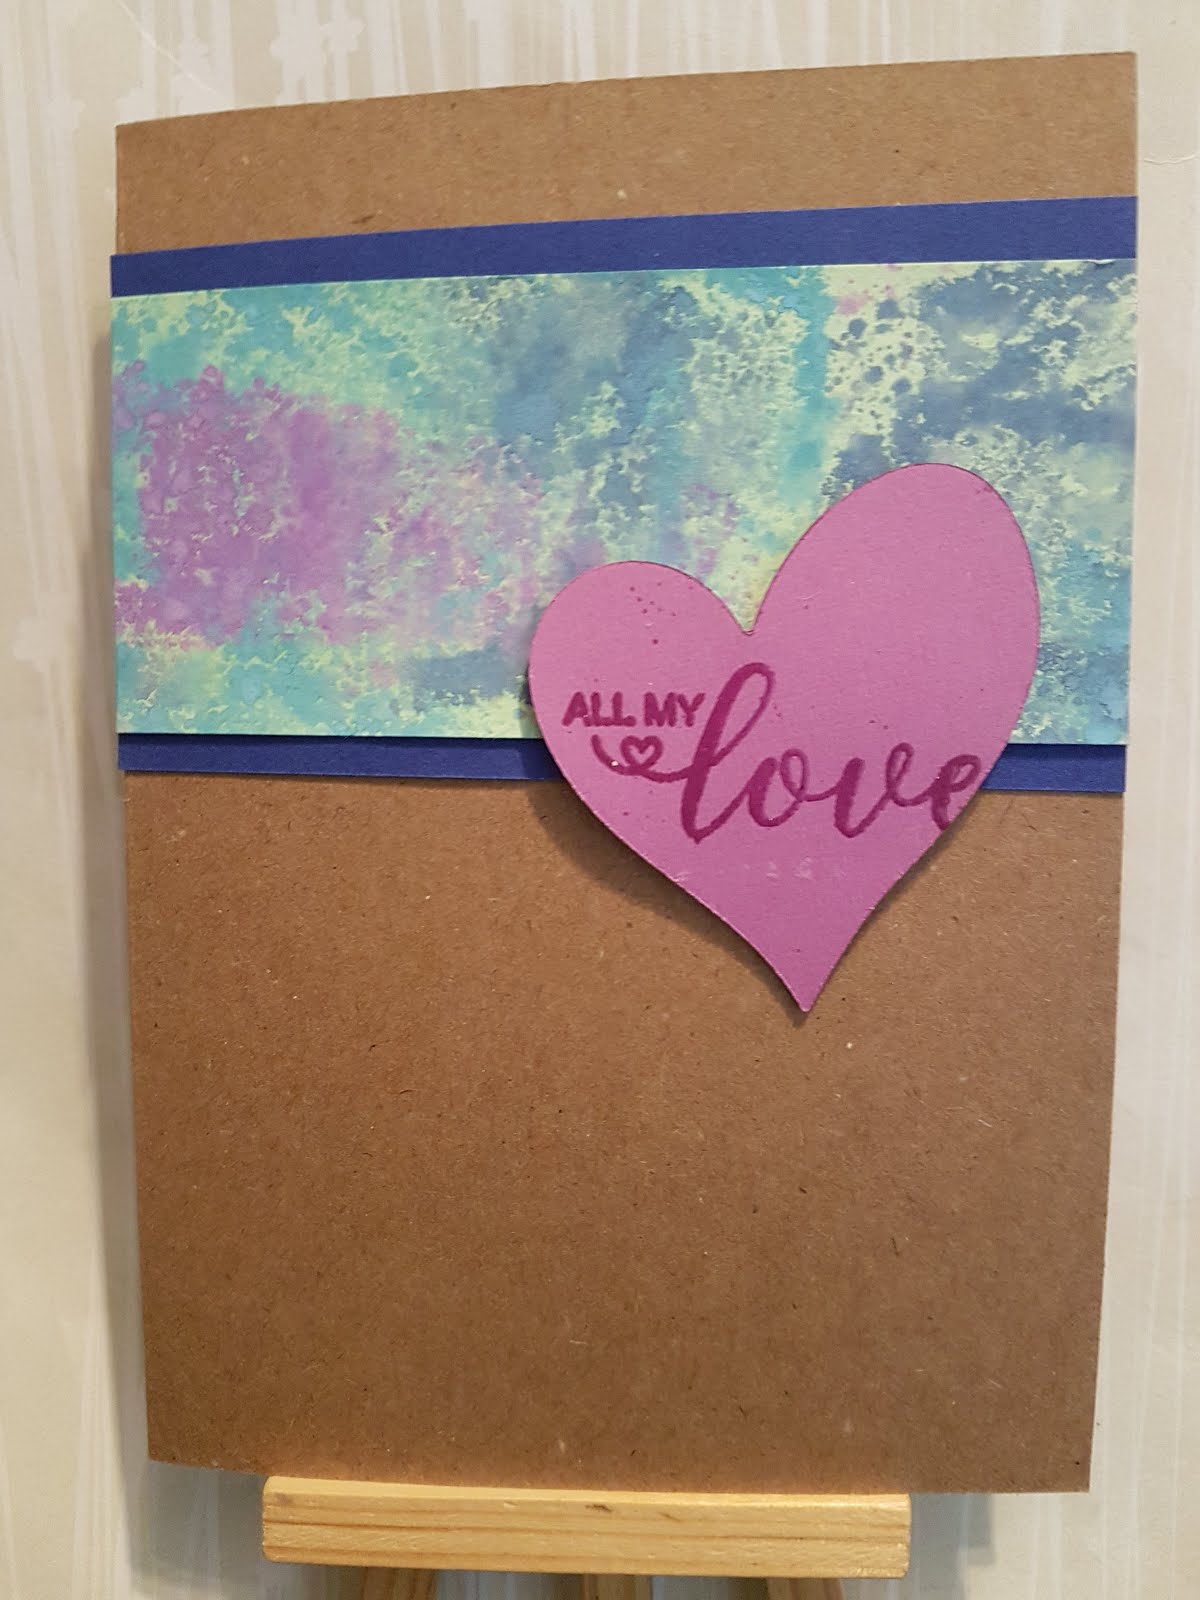
Project 457: A smooshed background valentine


The layout at CAS(E) this Sketch looked really good and I wanted to do something that was natural and not overly girly. I decided to go for a smooshed background in Distress Oxides and layer it against kraft, not white. I used a die cut purple heart that was left over from the card I listed yesterday and then heat embossed a sentiment that I got free from a magazine. I raised it on foam to give it a tiny bit of texture. I kept it super simple, I tried adding dots, bling, all sorts and I decided that keeping it plain was best. Really happy with this simple card, I think it's a great alternative to some of the OTT ones I've made before!