Showing posts with label Brights. Show all posts

Friday, 28 September 2018

Project: Birthday card with all the skills


The trouble with one of your best friends being a card maker is that you really have to pull out all the stops for their birthday card each year. It can't be some 'threw it together this morning as I forgot' nonsense that I get away with on other friends. Nope. For Claire, I have to make it technical and complicated!

So this year I was thinking what to do and I was reminded of a technique we did when we first started out - stamping over a few layers and splitting them out in the layout. We used to do this literally over multiple sheets but I wanted to feature dies so instead I did a layout over one sheet that I could cut out with nesting dies. 

I used a Studio Calico sentiment in the middle and then used some big graphic flower stamps from a magazine freebie arranged around the edges. I heat embossed everything in black, then blended using Distress Inks. I layered up the spotted rectangle dies because I liked the little dot details that it brought to the layout - makes it feel a bit more contemporary and tropical. I layered them up using foam tape and over a black card to make it stand out and tie back with the embossing. 

Happy birthday to my dear friend for life, Claire, who is crazy and loving and generous and brilliant. Love you man. The dog loves you most. x

Thursday, 13 September 2018

Project: Ribbon card for MAWTT


This week at Moving Along with the Times we're doing a ribbon theme - and I freakin' love ribbon. I have SO MUCH of the stuff, it's tangled and balled and tied together and covering so much space...and I love it.

I decided to feature it instead of an image and cut 6 strands in dotted grosgrain ribbon, knotting them in the top third and then cutting them on the bias. I put them on a diagonal for a rainbow effect and then used Stampin' Up Endless Birthday Wishes set to split the sentiment in the top and bottom. I added a touch of mustard over the navy to give it a bit more of an accent.

I had so much fun shopping my ribbon stash for this I hope it provides you with the same entertainment as you craft!

Tuesday, 4 September 2018

Project: A bright balloon challenge card


I like something a challenge that makes me think differently about my stash and the challenge at CAS(E) This Sketch made me think about how to put something on the diagonal.


I looked through a dozen images and stamps and things before remembering that to get a rectangle shape you don't have to have a rectangle-shaped image, the great DT cards showed that in the challenge and I decided to make a shape out of multiple punches. The balloon stems, sentiment and punch are all Stamping Up and I decided to go for a classic rainbow color scheme.

Sometimes the simplest things are the cheeriest. The purple stripe and the very light hexagon-print background paper are all scraps from my stash, years old, and I decided the light pattern kept it from being boring and added a touch of contemporary print.

I like the sentiment being so blunt without a happy birthday or anything so I can use it as a congrats card or something other than a traditional birthday. Why not keep the options open?

Very fun to play with, thanks for the sketch inspiration!

Friday, 6 July 2018

Project: Blended mini card set with modern sentiments


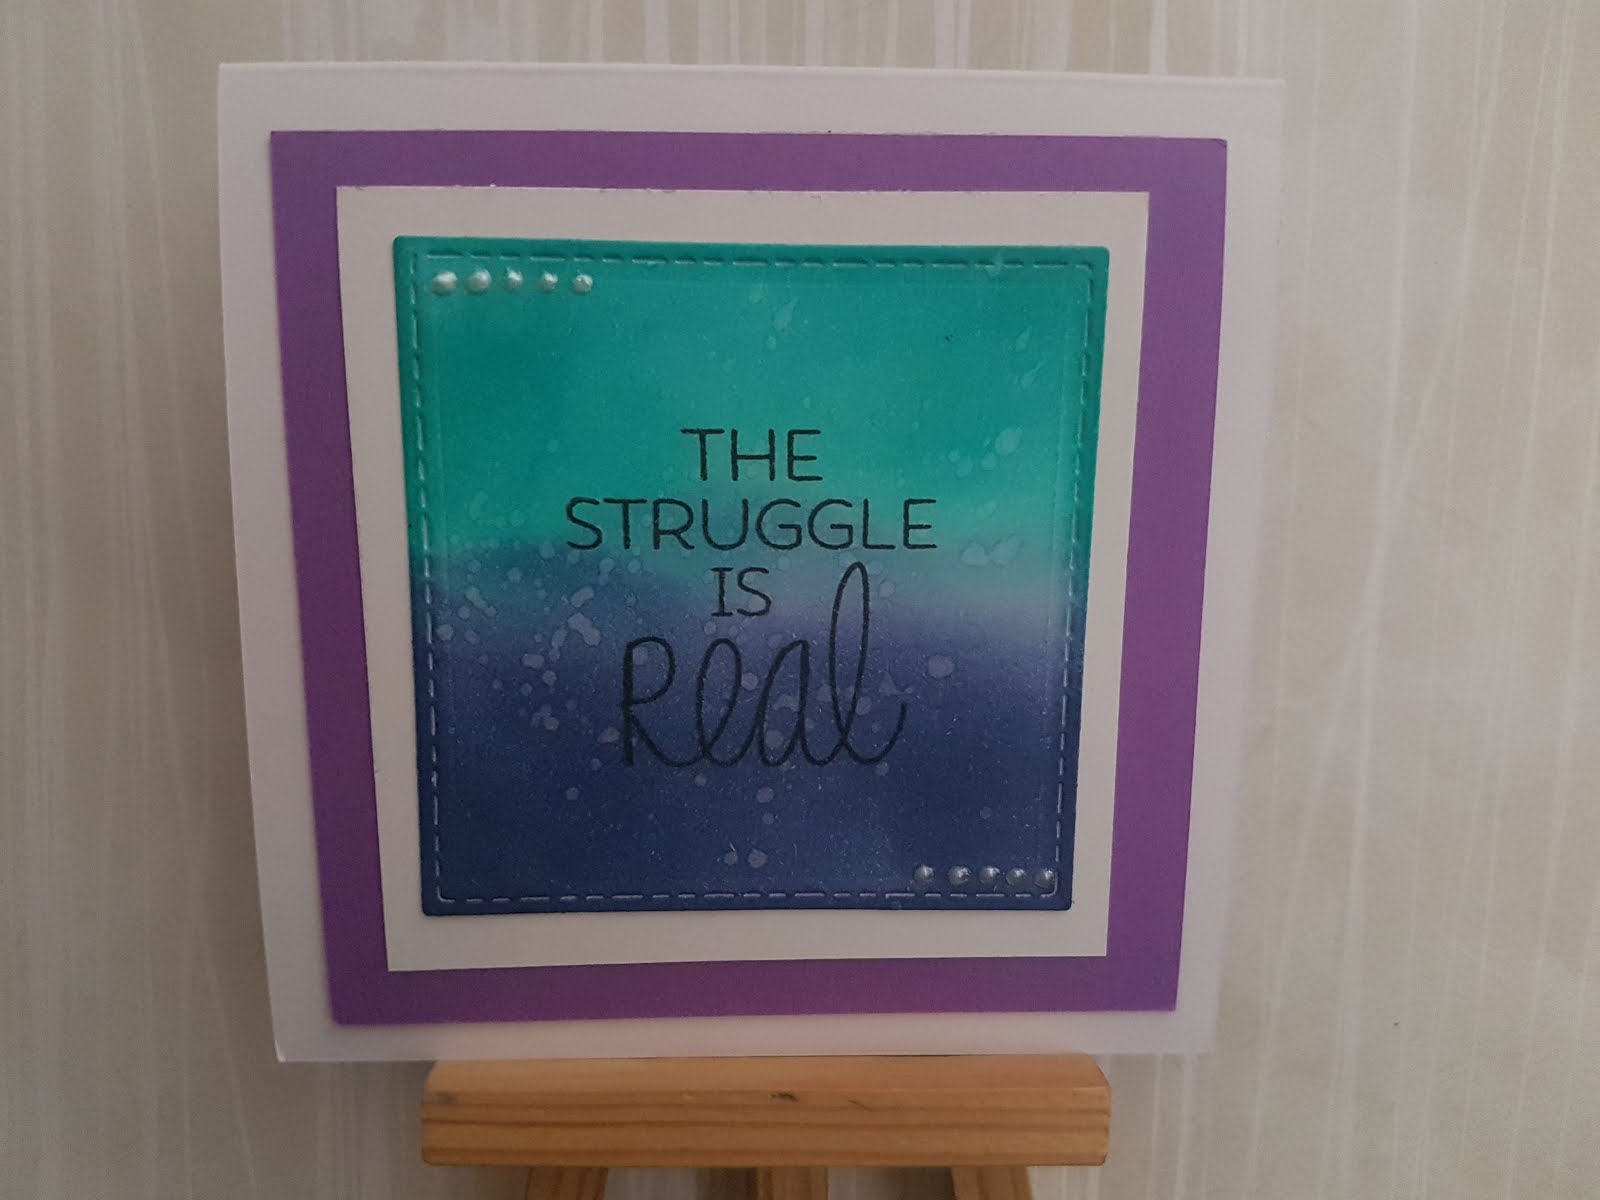
I love mini playdate challenges and Claire and I had too much fun talking this past weekend, it really inspired me to do some silly things. She was testing herself with one stamp set x4 cards so I decided to do the same. I started with an image set but actually landed on a sentiment set. These sentiments crack me up and I thought, why not make a mini card set and give them to a like-minded friend? 

For each one I die cut a small square and then blended a two-tone color scheme, making sure colors overlapped from one to the next but never repeating the same combination. These then got stamped with the big hero sentiments and, just because they were feeling a little plain, I did a double mounting of white and then purple, pulling them all together but also giving them a bit more visually. 

I picked up my little bottle of liquid pearl dots and added some accents to the corners. I don't love it - truth be told - but I guess that's just experimentation. I like the vertical ones better than the horizontal ones so that's a learning. 

Finally I splattered some water on them to make them a bit more irregular. Love the set, definitely doing this again with a few minor adjustments. 

Sunday, 17 June 2018

Project: Blended texture paste star card


I loved the layout at CAS(E) This Sketch this week, I had so many ideas but ended up going with one of the simplest:


I started with a piece of graph paper and blended it with Distress Oxides for a chalky finish. I then added silver Nuvo glitter paste through a star stencil for an irregular spray of sparkly stars. The sentiment is from a Lawn Fawn set that I got second-hand from a demonstrator.

I love playing with a few techniques in one go, and getting to sneak in glitter and a rainbow will always make the exercise a bit more fun!

Sunday, 13 May 2018

Project: A lovely Bridal Shower challenge entry


I decided to play along with some challenges this weekend to make a Bridal Shower card for one of my best friends. She's Beatle-mad and I thought this All You Need is Love sentiment + die set would be perfect - I just needed to make a card around it.

So the combination of colors at The Paper Players and the layout at CAS(E) This Sketch were a perfect combo as she loves pink and orange:


I made an umbrella out of pink and orange papers to go with the 'Shower' theme (it is tradition after all) and I used a heart stencil to add some raining hearts to the background paper. I die cut the 'love' sentiment in yellow and orange for texture. I added a lime green border of heart scallops to add the fourth colour.

So while it's a wedding card it is super summery and cheerful - not the usual white-on-white. I think she'll like it and it was a fun way to get some inspiration this weekend.

Sunday, 22 April 2018

Project: Cheerful balloon birthday blog challenge


I've been crafting in the margins rather than making it a priority lately and it's made me a bit sad - I love to craft and love to make time for it but sometimes life gets in the way. Sighs. Anyway - I saw the sketch at CAS(E) This Sketch and thought it was perfect for a play:


I decided to make a colourful birthday card - and although my result is pretty simple I really couldn't decide for ages what to do. I must have looked at every single stamp I have, every die, everything that could be a big vertical feature before returning to one of my first ideas to use a bunch of balloons to form the exclamation point.

The balloon set is Stampin' Up - I used the stamp and punch set to match the colors to the fun paper that I've had in my stash for ages. I love bright printed papers but when they feature text it can be really hard to make it work. Even though the paper is busy it is the paper doing all the hard work and the balloons are all lovely solid colors (punched from paint strips if you want to know!).

The sentiment was an ad hoc stamp purchase I got in Paper Source a while back - it's an older wooden block stamp and therefore makes it a bit trickier to use when you're used to lovely perfectly aligned clear stamps. I am really pleased with it though, it's cheerful and bright but just about unisex...maybe. Pleased I got a chance to play at the desk all the same.

Saturday, 31 March 2018

Project: A hoot of a little owl card for Sketch Saturday


This week it's the 5th Saturday at Sketch Saturday which means you can pick a sketch from 215-506 and go to town!

I decided sketch 498 was just up my street and suited the image from our sponsor crafty Sentiments Designs perfectly. I chose Hootie - Rain rain go away. I do love an owl image! I loved the idea of making it very light and cheerful so I stuck with a yellow theme. I colored the image using ProMarkers and then die cut it using a stitched circle and added glitter glue to the rain. The patterned paper has been in my collection for a very long time and I'd never used it. I decided now was the time. The sentiment was stamped using a banner stamp and then fussy cut. The sentiment actually comes from a Hero Arts set and I thought it suited the image perfectly.

I originally left the right column white but it looked half done. The kraft stock made it look more intentional and I think the yellow pops more as a result.

Hope the sketch challenge inspires you to have some fun this week!


Sunday, 4 March 2018

Project 464: A sweet 1st birthday card


My niece's birthday is coming up and I decided early on to make her an owl card. I have given her a lot of owl gifts and books and decided that it would be perfect to match this with her birthday present.

I chose a Unity Stamp Co image that is 2 years old (maybe 3?) and I loved the challenge at Retro Rubber - the sketch was perfect for a cheerful kid's card:


The owl is heat embossed on a white circle (in hindsight I think it's too big and I should probably have cut it down smaller) and then I added some punched balloons with hand-drawn strings. I added the blingy 1 for my niece as well. The backing paper is from my stash - I've had it for years and years and thought it was really fun for the card. The sentiment is die cut from a Sizzix set.

I love that little owl, I think it will go so well with the little owl gift I have planned for her present :)

Thursday, 1 March 2018

Project: A rainbow texture paste card for MAWTT


I absolutely LOVE our rainbow challenge at Moving Along with the Times this week. I decided to do something a bit artsy and I loved where I ended up. I used a big block stripe stencil to create my rainbow with Distress Oxides.

I then used a cloud stencil with white texture paste to create the clouds. I went over them a few times and I liked the texture being a bit irregular. I had to be very careful to make sure the clouds were fairly consistent as the thin initial layers were too transparent and didn't look white enough. The sentiment is one I got second hand and I think it works so well with the layout.

I wanted to keep everything else simple - I tried bling and glitter and all sorts of things but decided clean was the best way.

Hope the challenge inspires your entries as well!

Tuesday, 23 January 2018

Project 458: A tic tac toe Bugaboo challenge


This weekend I was having so much fun with challenges I knew I had to play along with the Bugaboo Tic Tac Toe challenge. Claire had already been tearing it up with their birthday challenges and I wanted to see if I could put myself to the test.


I went for the right hand column: Ribbon, Bugaboo, Dots & Stripes.

I used these Love Monsters as my base - Claire used them in her challenge entry here and it inspired me to get them out for a play myself. I decided to limit myself to a single color scheme and went with orange and red. I colored the monsters using ProMarkers and then die cut out a square. The spotted backing paper has been in my stash for ages and was already cut into so I counted it as a scrap. The ribbon completes the 'stripe' requirement and I added a birthday sentiment that Claire had given me years ago. The googley eyes really add dimension, they make these little love monsters even sweeter!

Love the output, will definitely be playing along again.


Tuesday, 31 October 2017

Project 446: A technique-rich anniversary card


Claire and I always like to show off in our cards for each other and even simple-looking cards should feature some hidden complexities.

As it's her wedding anniversary I wanted to make her something fun and cheerful. This card features a few fun things, including a new toolset she gave me this summer. She introduced me to Distress Oxides and this card features three colors though the yellow all but disappears with the pink and orange. I then spritzed a stamp with water and laid the card on top to get a bleached chevron. I then used punched hearts (that I think I got when Claire lent me her scalloped heart punch years ago) and then used a die to get the sentiment.

It looks simple but it's cheery and fun and the colors of a Tequila Sunrise - perfect for recognising their honeymoon in Mexico!

Thursday, 3 August 2017

Project: Things that fly at MAWTT


I have been making a lot of cards lately that involve birds, butterflies, hot air balloons, and I realised that I seem to be obsessed with things that fly. I thought it would be the perfect challenge for Moving Along with the Times this week!

My card features a set of bug stamps that I heat embossed in black. I put them on a strip of watercolour paper that I painted using an aqua brush and Distress Inks. I tried to choose colors associated with that particular bug and I'm really happy with the combination. I added a sentiment from Tim Holtz idea-ology stickers that I thought worked well for the set. I tried it on white, black and kraft card and decided black looked best.

Sunday, 30 July 2017

Project 432: super CAS challenge


I saw a number of challenges that I thought would combine for a fun CAS card.

I took the colours from Color Throwdown, the sketch from Freshly Made Sketches and the challenge of 'no stamps, only dies' from CAS-UAL Fridays to come up with my entry.


I masked a stripe diagonally down the page and used Mustard Seed and Picked Raspberry Distress Inks to blend the stripe. The sentiment is die cut from Stamping Up set and I added pearl accents for texture. I am really pleased with the blending and mask result, I may even make a few more of these as a set.. ..

Sunday, 23 July 2017

Project 430: A piñata sketch and color challenge


Claire recently bought me this fantastic little piñata set from Lawn Fawn and I was saving it for a birthday card for a colleague who I knew would appreciate it. 


Because the image and sentiment are relatively small I wanted to look at some sketches where things would be concentrated in one area so it wouldn't look too distant. I found a great one in CAS(E) This Sketch and then by magic the colors at Color Throwdown this week were a perfect complement to what I wanted to do:


I started with a stamp of the image and then colored it with ProMarkers and die cut it with the matching dies. I used foam tape to pop it out and then die cut stitched squares in white and turquoise to get the central panel. I used Enamel Accents to add confetti around the 'Smash!' part of the sentiment and large enamel dots to frame the central panel. The background paper is American Crafts and I have been saving it for a special occasion - I've loved the pattern and color and decided it was finally time to use it. That's what it's therefore after all! 

Really happy with how it came out, may have used slightly brighter ProMarkers if I were to do it again but all things considered I think it was a good inaugural card for the new set.


Project 429: A fun little rainbow challenge


I saw the rainbow challenge at Retro Rubber this week and I really wanted to play along:


I love rainbows - if colors follow the right sequence I'm over the moon and I find myself wanting to edit colors in patterns I find if they're close but not quite in the right order.

I decided to get out a set of hot air balloon stamps that I have had for about 3-4 years now, my mom gave them to me and I've always loved how perfect they are to take on color through almost any means. I heat embossed them in white then used an aqua brush and a range of Distress Inks to create the rainbow pattern.

For the background I used a cloud stencil with Broken China Distress Ink and then topped it all off with a sticker sentiment from Tim Holtz that I cut in half to fit the space. It's a really cheerful card and I'm really thrilled with out it came out, I think I may even turn it into a set as it was pretty easy!

Saturday, 27 May 2017

Project: Sketch Saturday May 27th


Finally week as Guest DT at Sketch Saturday and I'm very sad this is the last of the posts. Happily the sketch was great to play with, I love a starburst!


The image is from AMB Illustrations and I decided to color it with Spectrum Noir pencils. I decided to tilt the sketch on its side to have the duck at the top and then have the starburst coming below as if it was the puddle spilling out. A bit silly but I liked the idea. The stardust is comprised of vellum layered over the colored card and I embossed some blue card with a Swiss dots folder to add texture. The sentiment is from Stampin' Up, it's a rare vertical sentiment and I thought it worked brilliantly with the original sketch. 

All in all I'm very sad to leave the Sketch Saturday family but it has been absolutely brilliant working with them and I've loved playing with them every week! 

Sunday, 9 April 2017

Project 409: A summery sketch challenge


I haven't had the time/mojo the last few weeks for crafting. Which is sad as it's one of my favourite ways to unwind and enjoy my evenings and weekends. But I hit a craft store on my way back from vacation and it inspired a good session at my desk. So now I'm back in it!

I went 'sketch shopping' as I had so many fun new goodies I was a bit overwhelmed and a good sketch challenge helps me focus. I really liked the one at Sketch Saturday:


I started with the background paper, a new one from The Range by Simply Creative. [Spoiler alert: Claire, you are getting this too.] I knew I had some pre-cut die sentiments from Claire about a year ago and I dug through them until I found this great Smile circle. I layered it over a pink scallop circle which doesn't exactly match the sketch but I hope they forgive me!

I then stamped, heat embossed and die cut a flamingo to layer over my stripes of cloudy gem stones. I love these at the moment - they seem more modern than bling and in my session yesterday I used them in just about everything I made. It looks simple but it got me die cutting, embossing and punching and that's the ticket for a good bit of inspiration!

Monday, 13 February 2017

Project 396: A starry pink birthday card


I saw the sketch at CAS(E) This Sketch this week and thought it would be fun to play along and make a birthday card for a girlfriend. She loves pink and so with that color in mind I set out to make something fun for her that could also incorporate some of my new craft toys.


I chose a starry stencil and used Picked Raspberry Distress Ink for the pattern. I embossed a strip of card with little Swiss dots and then added a black frame to make it pop out. The butterfly is die cut using an X-Cut die and the message is heat embossed in white powder. It's very girly but I think she'll love it!


Wednesday, 14 December 2016

Project 383: First of several card gift sets


I am making a whole bunch of card sets as gifts for people. I should have started this process MUCH sooner but here we all are, crafting late into the evening to get things done before I see the recipients! I'm using it as an opportunity to go through my stash and use things I haven't played with in a while.


This is the first of a few card set posts. The set featured here was such fun. I stamped and die cut the fruit Sizzix set Claire gave me last year and used mini 4x4 cards as my base. The colored papers are from a Recollections square pack (no die cutting or trimming involved!) and I embossed them in different folders: the triangle is from Stampin' Up, the houndstooth is Sizzix, the swiss dots are Cuttlebug and the basketweave I can't remember. I added different sized enamel dots from Recollections to match each card. They took a bit longer than you'd think from looking at them but I really love them!


This next set was a bit simpler. I die cut some intricate butterflies and then layered them over punched hearts. I die cut big chevron patterned circles and added a few touches of bling and enamel dots. They would have been really quick if it weren't for the 8 die cuts required. Still, a very clean card and it makes a nice set for the person who is receiving it....thought I must say I prefer the fruit!